Simple home carving with step by step photos.
Chrysanthemum from Chinese cabbage

1. Remove loose leaves from a head of Beijing cabbage weighing from 300 to 700 g and cut off the upper part of the head, leaving about 12-15 cm.

2. We work with an oval or triangular carbide groove knife.

3. Let's make cuts of different lengths along the thick veins of the leaves, directing the knife from the top cut of the leaf to the base of the cabbage. We make the beginning of the cut thinner. As we approach the stump, we deepen the knife into the cabbage.

4. Without cutting 1.5-2 cm to the stalk, remove the cut out large leaves. If the sheet is held tight, make a few notches with a small knife.

5. We cut the subsequent rows of leaves in the same way, shortening the length of the chrysanthemum petals to the middle. If the edges of the petals are thin enough, then in cold water they will curl up into rings or curve beautifully.

6. Put the "chrysanthemum" in ice water for half an hour. The product will take on an elegant shape. Let's cut a couple of green "leaves" from a cucumber and make a composition on a dish with salad or various cuts.
Cucumber LILY

1. Cut off a piece of cucumber 7-8 cm in size, cutting off the tail. Let's make a cut in the form of a leaflet, without cutting to the bottom edge of the workpiece.

2. Make other leaves, with a small distance between them, bypassing the workpiece in a circle.

3. Using a knife, make a cut in a circle 1-2 mm thick, creating a platform for cutting the next row. petals.

4. With an oval knife, we make the next row of petals in a checkerboard pattern relative to the previous row. Again we cut the platform for the next level of petals. Make as many rows as the size of the workpiece allows.

5. With a noisette or a knife, scrape the core of the cucumber, creating enough space to place the core in the center of the flower.

6. Cut the leaves with scissors, create a triangular shape at the ends. Dip the flower for a few minutes in ice water - and it will open beautifully.

7. From carrots, pumpkins or radishes, we will make a core of a suitable size. Decorate it with cuts.

8. Insert the core into the flower. Can be fixed with a toothpick.
Let's put a lily on a twig with leaves or on a painted wooden barbecue stick. Leaves for it can also be cut from a cucumber.

CONE from carrots

1. Peel a dense carrot with a diameter of at least 3 cm, cut off a straight piece 8-12 cm in size. Use a knife to make a square “tail” for the future cone. Next, give it an oval shape.

2. Having processed the workpiece in a circle with a knife, we will give the thick end of the cone a rounded shape and prepare a platform for cutting the first row of scales.

3. Visually divide the thick end of the workpiece into 6 parts, cut out 6 petal scales in a circle. The depth of the cut is 2-3 mm.

4. With a knife, make a cut along the cone (deepening the end of the knife by 2-3 mm) under the scales, making out the three-dimensional pattern of the first row, thus creating a platform for the next row of scales.

5. In a checkerboard pattern with respect to the previous row, cut out the next row. Again we cut the platform for the next row of scales. We make as many rows as the size of the workpiece allows.

6. We lower the cone for 10-15 minutes in ice water - it will open a little and harden.

callas from hot pepper
ADVICE. If the pepper burns your hands after work, wash them thoroughly and wipe them with vegetable oil.

1. Take red or green hot chili peppers.

2. Cut along the length from the stem to the tip.
3. Carefully cut the pulp around the stalk. Seeds should remain on the stem.

4. Expand the pepper, rinse in cold water and give the workpiece the shape of a calla flower.

5. We make a hole on the spread of the future flower and carefully insert the stalk with seeds into it.

6. Cut out the leaves from any green product (cucumber or others) and create a curly composition.


1. We give the carrots the shape of a cylinder. We pierce along the center line with a thin wooden skewer.

2. Soak the vegetable in a salt solution for 2 hours (1 tablespoon of salt per glass of water). The product must be sufficiently soft and not break when thinly cut.

3. Visually divide the vegetable into four sides. We make the same cuts on the upper and lower sides, cutting through to the skewer. The distance between the cuts is 0.5 cm. Let's make cuts on both sides - between the cuts on the upper and lower sides.

4. Carefully cut the fruit in a circle with a long thin ribbon to the skewer. We cut off the skewer with the "stump" and straighten the net.

5. 6. Cut out several different colorful fish from a wide variety of products.


LILY from carrots

1. We give the vegetable the shape of a cone and a pentagon, cutting with a long knife in a circle from five sides. 
2. On each of the 5 cut sides, cut through the petal.

3. Shape the petal with scissors.

4. Remove part of the pulp from under the petals of the first row (make the cone thinner). We cut out five more petals, placing them in a checkerboard pattern relative to the petals of the first row. Do the same for the third row.

5. With a knife, shorten the remaining core and cut it into a cone

6. We split the core into stamens with a knife.

DAHLIA

1. Let's make a slightly flattened rounded blank with a diameter of 5-6 cm from a homogeneous product.

2. Cut out 7-9 petals with a medium oval knife, deepening the knife towards the core.

3. We cut off the excess pulp under the petals of the first row, forming a platform for the next row.

4. Cut out the petals of the next row with knives of different sizes, similarly to the first row. We place them between the petals of the previous row. Making it possible large quantity rows.

5. We cut to the end and make out the middle.

Chrysanthemum from onion
for decorating salads, meat, fish and vegetable dishes

1. To prepare chrysanthemum, take a small round onion.
You can take both white and red onions. The smaller the bulb, the more beautiful the flower turns out.
Try to choose a thin-walled bulb, then the petals turn out to be thinner and open more beautifully.

2. Peel the bulb and cut off the top and bottom by about 0.5 cm.

3. With a thin sharp knife, carefully cut almost in half, without cutting to the end about 0.5 cm.
The incision is made from the upper side - where the feather grows.

4. Then cut in half again in the same way.

5. Next, cut into as many pieces as you can. It is desirable to make as many incisions as possible.
If the cuts are not deep enough, the flower will not bloom well, and if it is too deep, the flower will fall apart.

6. Put the bulb in water at room temperature - the water should completely cover the bulb.
After an hour and a half, the chrysanthemum should "bloom". The time of "blooming" of the chrysanthemum depends on the variety of the onion. Some varieties are enough and 40 minutes, and some need a couple of hours.

7. To give the flower brightness, dip the tips of the blossoming chrysanthemum into beetroot juice ( raw beets rub and wring through cloth). Coloring time - until the desired color is obtained. You can use any other food coloring- brightly colored juice (for example, cherry, blackcurrant), yellow solution of saffron, Cahors or other red wine, pickled beetroot brine, etc.
You can paint the whole flower.

Orange colored "chrysanthemum" on lettuce.

onion flower

1. We clean the bulb without cutting off the root seal, but only after cleaning it well from the roots.

2. We make 4-5 cuts (in this example we make 4 cuts) to a depth of 2-3 layers (in this example - 2 layers).

3. We bend the extreme layers (petals), and remove the inner incised layers with a knife. We do all this with caution, because. petals are very brittle.

4. Again we cut the layers of the bulb, shifting the cuts in a checkerboard pattern relative to the first petals. The first incised layer is left, and the inner layers are removed again.

5. Repeat these steps until we reach the middle of the bulb.


7. Then we place in vinegar marinade of water, vinegar and sugar (vinegar and sugar to taste) for 10 minutes or more to obtain the desired taste.
If you want to get a colored flower, add food coloring to the marinade (see previous recipe).

We take out the "flower" from the marinade, slightly shake off the liquid, beautifully straighten the petals and place on a dish.

leek flower

1. Fold a wide leaf of leek in half lengthwise and make frequent cuts from the side of the fold, as shown in the photo.

2. Roll up into a roll - this will be the core of the flower.

3. Make petals from the wide parts of the onion.

4. Fasten the flower with toothpicks and put on a dish.

Leek bow

1. Peel young fresh leeks, cut off the white dense part of about 20 cm. At the same distance from each other, cut the onion lengthwise with several cuts to the full depth (to the center).

2. Bend the “petals” of the first row and cut them approximately in the middle, giving them a triangular shape.

3. Fold the petals of the next row inward with a “bow”.

4. Continue row after row to fold the petals. If the bow does not hold well, you can strengthen it with pieces of wooden toothpicks.

Festive "bouquet" of Beijing cabbage

1. Take an average head of Chinese (Beijing) cabbage.

2. Cut off the top loose part.

3. Traditionally, vegetable carving (carving) is performed using special knives of various shapes. For example, such chrysanthemums are cut with a carving knife in the shape of a groove. But you can adapt a simple tool at hand - an olive can lid, which you need to bend in half to make an oval groove. The edges of the resulting groove are not too sharp, but you still need to be careful. We must adapt to hold it as comfortably as possible, without touching the edges.

4. Take the groove as indicated and cut long grooves along the hard part of the head. At first, the groove should not go very deep. Closer to the base, you need to direct it deeper inward.

5. Before reaching about 2 cm to the end of the sheet, you must stop. Remove the groove and cut out the petal next to it. First, 3-5 petals are placed on one sheet.
The world of modern cooking is full of innovation. In the era of the availability of various cuisines of the world, it becomes quite difficult to surprise sophisticated gourmets. But what if, apart from palatability food, one would be amazed by the amazing appearance?! You can surprise, create edible masterpieces, give unimaginable shapes to the usual forms of products with the help of carving from vegetables and fruits.
History of carving
It's no secret that everything ingenious is simple. This is how you can characterize the amazing art of carving, which arose many millennia ago in the expanses of the eastern lands of Asia.
Carving owes its appearance to attempts to somehow diversify the meager diet, which has always been in short supply among the poor inhabitants of East Asia. However, in contrast, they had an abundance of intelligence and ingenuity, which allowed carving to be born into the world. There is one legend, according to which once a rich gentleman came to visit a poor family. He demanded to set the table, but the hostess had nothing but a few fruits and vegetables in stock. Fearing the wrath of the master, the hostess decided to deceive him. She created strange birds and animals from fruits and vegetables, which so impressed the rich gentleman that he did not dare to try these creations - they were so beautiful. Since then, all the inhabitants of the country, as well as those nearby, began to decorate their tables, creating incredible compositions from simple products.
Modern fruit and vegetable carving is still one of the most interesting arts in Asian countries. However, it is worth noting that his techniques have made significant progress. If earlier there was not even a good knife in service, today the field of possibilities is expanding, thanks to modern tools. However, many masters adhere to the classics - they try to follow ancient methods, avoiding newfangled devices.
Is it possible to carve at home?
The answer to this question is of course yes! Not only possible, but absolutely necessary! This art will allow you to incredibly diversify your long-familiar home-cooked food. It is generally accepted in the world that carving is a lot of creativity, and has no special relation to the world of food, as such. However, we dare to resist such speculation. Thanks to carving, food can be not only tasty and healthy, but also beautiful. An example would be classic dish – mashed potatoes with meatballs. Speaking about the composition, it is quite difficult to give a twist to this dish. The lack of the possibility of creating forms, as well as the consistency unsuitable for design, keep the dish within certain limits. However, the decoration with vegetables, which acquire their new forms in the carving technique, can add brightness and novelty to it. Having learned all the subtleties of art, you will be surprised by all the facets that will open before you.
Modern types of carving
Nowadays, actual carving from vegetables and fruits is usually divided into several areas. These include:
- Chinese
- Japanese
- Thai
- European
1) Chinese carving is an amazing world where food is transformed using stencils. Although it is also customary in Chinese carving to create compositions with a knife, a stencil takes the place of the classics.
The difference in this direction is the choice in favor of vegetables. The only exceptions are watermelon and melon. The explanation is very logical - the art of stencil carving requires a larger area than other subspecies. In addition, the creation of stencil carving implies the maximum rigidity of the surface, which most fruits cannot boast of.
2) Japanese carving from vegetables and fruits - a real immersion in history. Taking in best traditions fellow (China and its carving techniques), the Japanese decided to bring a feature. She became the traditional carving of hieroglyphs, as well as the creation of complex paintings, which are based on martial arts. Apple and watermelon became classic objects for Japanese technology.

3) European type of carving- a combination of the traditions of the East with the classics of the North. This species stands out in a special direction, since Europe, unlike Asian countries, is much richer in terms of products. European-style techniques are concise and focus on geometry. The flight of oriental fantasy in this genre is not so pronounced. The emphasis is on ease of use.

4) Thai carving of vegetables and fruits- the quintessence of this art. It is the Thai version that has gained wide popularity around the world. The reasons for this phenomenon are simple - Thais create the most complex compositions. In their work, they strive for perfection, because for them carving from vegetables and fruits is not just an art, but a real lifestyle.
It should be noted that most of the famous schools and even carving academies focus their attention on Thai version.
There are several reasons for this:
- in the Thai version, there are many techniques that are available to beginners;
- there are no restrictions on art - the creator can turn off fantasy control and create their own masterpieces;
- combinatoriality, which is expressed in the possibility of combining various techniques;
- no need to purchase a wide range of equipment for creating compositions.

Based on this, as part of our lesson, it would be wise to focus on the Thai method.
Tools for creating masterpieces
Now it is necessary to highlight in more detail the basic tools that you will need to comprehend the art of carving. Among them there are a huge number of variations, but the main ones are:

Additional items you may need as you refine your practice include:

However, this list is far from complete. The popularity of carving has led to constant developments in the field, often resulting in new tools.
The basis of skill, or the secrets of professionals
In order to make your first experience as productive as possible, you should pay attention to the achievements of eminent carving masters.
The main postulates that will allow you to successfully begin to improve in your chosen area include the following points:

The main thing in carving is practice. Over time, you will be able to learn how to correctly calculate the force of pressing the knife, as well as the angle of its direction.
Additionally, the masters note that fantasy plays a huge role in carving. Even if something didn’t work out for you, look at your creation from a different angle - perhaps your small flaw or small mistake allowed a new technique to be born.
From theory to practice: carving for beginners
Now that the basics of this art have become clear to you, it's time to put the acquired knowledge into practice. In order to achieve the best result, you should gradually increase the complexity of the work. Through such a gradation, you will have skills, thanks to which in the future any element will be available for you to manufacture.
First of all, we choose the object of creation. Experts advise starting with the following applicants:
- cucumber;
- carrot;
- Apple
They have earned such trust due to their qualities - a dense consistency allows you to get the necessary skill with minimal loss of quality.
So, let's see what masterpieces a beginner in carving can make.
1. Cucumber flower

It is necessary to take one dense long cucumber. We cut the middle into halves (2-3 pieces are needed), and we will use the edge with the “tail” to give the composition color and create a flower.

In the flower part we make six cuts, not reaching two cm to the tail (use a long knife).

We cut the resulting blank along the edges to get the outlines of the petals, as in the photo (use a Thai knife).

We remove the core of the cucumber (if there is no special knife, you can carefully make it with a spoon). Next, we make cloves with a Thai knife.

Now, with a Thai knife, carefully separate the skin from the pulp. Finally, make small triangular windows at the base.

Place the blank in ice water - so you can straighten the future petals.

From the pulp of the cucumber, make a round core, which must be decorated with an ornament and placed inside the flower.

We cut the cucumber, not reaching the base, as shown in the photo (7 layers each).

We divide the plates into 7 pcs.

We make bends of each even plate (in one direction);

We collect everything together and enjoy the creation of our own hands!

2. Carrot cloves
It is necessary to cut the carrots according to the proportions shown in the photo.

On the long part, using a Thai knife, it is necessary to cut the grooves. Their number can be unlimited, but you should not grind too much.

Next, we cut the resulting part with grooves in such a way that we get thin flowers.

The remaining part needs to be corrected - cut its edges so that it takes a conical shape.

On the wide side, using a Thai knife, you need to create a semblance of a grid.

Create, by shallow longitudinal cuts, pockets for the finished petals.

Place the petal blanks in the cut pockets.

The carnation is ready.

For beauty, you can decorate the core with dried cloves or something else.
3. Apple flower

Arm yourself with a hard apple and a Thai knife.

Cut off 1/4 from the side where the apple has a tail.

Carefully, without reaching the end, separate the peel with a thin layer of pulp from the core. It is also necessary to make 13 cuts - they will serve as blanks for the petals.

Using the marks, make triangular cuts to create petals on the apple.

Now you need to repeat 13 marks, and in the same way cut the petals from the apple pulp.
Important! The petals of the second level must be between the petals of the first level.

The procedure should be repeated with another row of pulp.

Next - create the last row of petals. Remove the bones from the middle and fill it with something of your choice. Something brighter would look good.

Thus, carving vegetables and fruits is an amazing activity. It keeps the traditions of the ancient East, at the same time combining them with new technologies. Allows you to turn food into works of art that give us not only food saturation, but also aesthetic pleasure.
Having tried your hand at carving, you can diversify homemade food, as well as surprise your family and guests with your extraordinary approach to creating dishes.


Required Tools
To create the simplest works, it is absolutely not necessary to use special tools. A sharp knife with a thin and flexible blade and a little patience is enough. If you are planning to seriously engage in carving, you should stock up on a set of special tools:
- Thai knife: the main tool that is indispensable when carving small parts; has a narrow and short sharpened blade;
- sickle-shaped knife: similar to Thai, but its blade is wider, it is used to cut out larger patterns;
- long knife: looks like an ordinary kitchen knife, but has a narrowed blade; is a universal tool and can be used for any type of carving;

- carving knives for cutting leaves, petals and other floral ornaments: they can be oval, V-shaped, round or square, wide or narrow;
- knives for cannelling (creating grooves);
- small scissors with thin blades to give the edges a decorative shape;
- spoon-noisetto for taking out the pulp;
- carving for removing the core of apples or pears and creating recesses in patterns: it looks like a knife with a circle-shaped tip;
- mini molds;
- girole: a tool for removing the thinnest layer from cheese and other soft products;
- toothpicks and gelatin for fastening parts.


Advice! Finished works can be boiled or fried. For example, making flowers from soft boiled carrots and beets is more difficult. Therefore, figurines are first made, and then they are steamed. blanks from raw potatoes can be deep fried.
Preparing vegetables and fruits
Almost any vegetables are used for carving: Bulgarian and hot peppers, radishes, cucumbers, pumpkins, cabbages, potatoes, tomatoes, etc. Of the fruits, apples, oranges, lemons, melons and watermelons are the most suitable for work.
The main thing is that vegetables and fruits are even and smooth, with the minimum amount pulp and seeds. Overripe fruits will not keep their shape, so you should not use them. Their colors are also important.


All vegetables and fruits are thoroughly washed and dried. Dense vegetables (potatoes, radishes, celery or ginger) are best taken out of the refrigerator first - in the heat they will wilt a little and become more plastic.
Apples and quince, prone to browning, are pre-sprinkled with a solution of vinegar, lemon juice. So that carrots do not break during work, they are soaked in salt water for a couple of hours. Cucumbers and tomatoes should be chosen the most dense, with a minimum amount of juice.
Advice! Fruits and vegetables can be stored in cold water for several days. So that they do not darken, they are sprinkled with lemon juice and diluted gelatin from a spray bottle. Watery fruits are not soaked - during storage they are only periodically sprayed with water.
The simplest examples of carving
With the help of virtuoso carving, you can create unusually beautiful edible pictures and ornaments from vegetables and fruits. However, the simplest works can be quite spectacular - the most important thing is to apply diligence and ingenuity.
Present to your attention simple carving from vegetables and fruits with step by step photos:
- you can make an original flower using an ordinary potato peeler - for its petals it is enough to cut the thinnest layer in a circle, for example, from a radish, roll it into a tight spiral with the pulp inside, and then straighten it;
- from a pumpkin, watermelon or melon, you can make a spectacular basket or stroller for fruit, ice cream or pastries; for this, it is better to pre-prepare a paper pattern and cut the edges and handle along it with a sharp knife; such a product can be decorated with carvings in the form of a floral ornament;


- from a small pumpkin, funny cups are obtained in the form of a head of a tiger cub, a cat, a bear cub or a monkey; ears and other parts are glued with gelatin; instead of eyes, halves of olives or pieces of eggplant are used;
- you can get bright callas from hot pepper in a couple of minutes, if you cut it lengthwise from the stalk to the very tip, carefully remove the seeds along with the stalk, and then round the edges of the pepper with a knife; now, closer to the edge of the pepper, we make a small hole and insert the seeds into it along with the stalk; bright flower is ready.


Advice!To obtain through holes in a thick-walled pumpkin or zucchini, you can use a drill or drill.
Watermelon crafts
Pirates' ship


Turtle


More ideas


Spectacular dark burgundy roses
From the thin edges of the foliage of red cabbage and cucumber "cups" you can make unusual flowers. For this:
- the upper coarse leaves are removed from the cabbage;
- thin scissors cut off the edges of sheets 2-3 cm wide;
- petals are formed from the received stripes: on one strip, depending on its length, there can be 2–3 or more;
- the round tip is cut off from the cucumber and the pulp is removed; the edges of the resulting cup are shaped with cloves using scissors;
- ready-made cabbage petals are carefully inserted into each cucumber cup;
- in this way, several roses are prepared: buds are made from tightly twisted petals, and fully bloomed flowers from straightened ones;
- the stem is made from the pulp of any dense vegetable - for example, a radish or a vein of cabbage; to make it green, an onion feather is put on it;
- each flower is attached to the stem with a toothpick;
- foliage can be cut from a leek or green apple.


Advice!In the carving technique, the most important place is given to the sharpness of the tool. Poorly sharpened knives or knives made of poor quality steel will crush the workpiece.
Photo master class on creating roses from strawberries


Dahlia
More complex work is more convenient to perform with the help of special tools. For this work, you will need an oval billet of potatoes or large carrots, slightly flattened from the sides. It is better to take carrots without a pronounced core - otherwise the flower will exfoliate:
- to begin with, we retreat a couple of millimeters from the edge and cut out 7-9 petals in a circle with a medium-sized oval knife; the knife should enter the pulp deep enough, but not to the very edge of the workpiece;
- preparing the second row of petals; for this, we cut off part of the pulp under the petals of the first row; you don’t need to delete too much - the number of rows should be as large as possible;
- the tongues of the flower have different sizes, so they should be cut with different knives;
- the last we make out the core with the thinnest knife.


Advice! The resulting masterpiece can be preserved for a long time if it is first dried in the attic or near the battery, and then varnished. Of course, it will no longer be possible to eat it after varnishing.
Salads, meat or fish dishes can be decorated with elegant snow-white chrysanthemum. To make the petals thin and lie naturally, it is better to take a small thin-walled bulb:
- after cleaning, it should be slightly cut off the top and bottom (no more than half a centimeter);
- with a thin knife, cut the onion crosswise, not cutting to the bottom of 0.5 cm;
- the incision should begin from the upper part from which the feather grows;
- if the incision is shallow, then the flower will not open well, but if the head is “opened” almost to the end, then it may simply fall apart;
- again cut the onion crosswise so that the cut line falls on the center of the previous cuts;
- we continue to make cruciform cuts to get the maximum number of slices;
- no need to try to separate the slices with your hands, otherwise the flower will break; the bulb just needs to be put in for an hour cold water- the chrysanthemum will bloom by itself; if the onion walls are denser (depending on its variety), it may take more than an hour for the flower to bloom;
- to color a chrysanthemum, you can dip it in food coloring, beetroot, Cherry juice, blackcurrant juice, red wine or saffron infusion; You can shade not the whole flower, but only its tips.

 Floral theme - a favorite for carving specialists
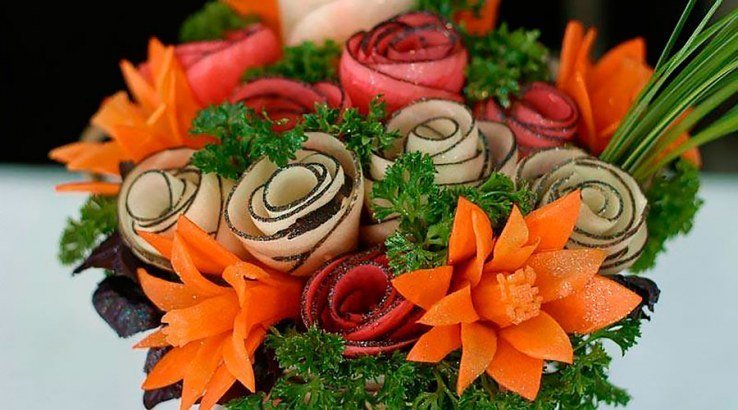
Advice! Bulb flower may have larger segments. To make it, it is necessary to cut only the top two layers into four parts, carefully straighten the first layer of petals, and remove the second with a knife. Do the same with the next layers. In the finished flower, the petals are staggered relative to each other.
Rosette of tomato, orange or lemon
To make this bright flower, you will not need special tools - only a sharpened knife:
- cut the tomato in half;
- cut the resulting half into small equal semicircular slices;
- “stretch” the chopped tomato on the board, trying not to displace any of its parts;
- gently twist one of the edges of our figure;
- to move the finished flower to the dish, you should clasp it on both sides with your hands and squeeze it tightly;
- With a small sharp knife, cut out a couple of green leaves from the skin of a cucumber for a rose; you can make them from thin strips of cucumber, folded in half; Making an orange rose is very easy.
- the upper leaves and the rough lower part of the stalk are removed from the head of cabbage so that the leaves do not fall apart;
- its upper part is cut off almost in half so that 12-15 cm remain from the place where the leaves are attached in the area of the former stalk;
- we will work only with large veins of cabbage, its green parts are completely removed;
- thin sections of different lengths are made along the veins with a carb knife from the top to the center of the head; closer to the stalk, the knife goes deeper - we should get petals that are thin at the edges and denser towards the center;
Advice! Decorations must be combined with the dish to taste. It is better to decorate hot fish or meat with tomatoes, carrots, cucumbers. Sea delicacies are in perfect harmony with lemon. Fruit is the perfect decoration for dessert.
To work, you will need an oval or triangular carb knife with a special groove and a small tight head of Chinese cabbage:
Advice! To master the carving of vegetables and fruits for beginners (see photo), it is absolutely not necessary to purchase a whole set of tools. Some of them can be made independently. For example, you can make a carving knife using a thin olive lid. It is bent at an angle so that a groove is obtained. For carving, you can use any wood carving tools.
multi-petalled radish flower
You can quickly make such a flower with a regular sharp knife. To do this, the upper and lower parts are slightly cut off from the radish and several parallel cuts are made on the sides of the root crop. The more often they are located, the more elegant the flower will turn out.

The second radish is cut into thin circles-petals. The resulting petals are carefully inserted into the slots of the first radish.
It is better to master the carving of vegetables and fruits from a photo or video.
The word "carving" comes from the English carving, which means "carving". Carving is called different types carvings - for example, wood, stone or bone. The carving we are interested in uses as a material fresh vegetables and fruits. This art, which combines cooking and sculpture, is also called culinary carving.

Thailand is considered the birthplace of carving as a skill of figured cutting of vegetables and fruits - it was there that this skill originated about two thousand years ago. There is a legend according to which for the first time the table for the royal meal was decorated with skillfully cut fruits. Today, carving is a frequent element of ceremonial feasts: figured decorations made of fruits and vegetables add festivity and originality to dishes, being both a decoration and a treat at the same time. Experienced craftsmen create real sculptural masterpieces from ordinary watermelons, apples, cucumbers and pumpkins - but art education is not required to master the basics of carving. For work, professionals use large sets of various knives and other devices, but for beginners to comprehend this art, a small set of convenient tools may be enough.

Photo: youtube.com/Fruity Fresh Juicy


What tools are needed?

Here is a set of basic carving tools that professional craftsmen use. The main working tool is the so-called Thai knife (a small knife with a sharp blade, shaped like a sickle). Next to it to the left are carb knives, they are V-shaped, oval or round. A device that looks like an ice cream scoop is a noisette. Plus - a small knife of the usual kind is used (in the photo it is below), scissors to cut leaves, for example, lettuce, and devices similar to vegetable peelers.

All these are special professional tools. If you are serious about carving, you might want to purchase a similar set. Beginners can be limited to a small sharp knife, scalpel, scissors and a device for cleaning vegetables and fruits.
How to choose vegetables and fruits?

Photo: youtube.com/Mutita EdibleArt
You should carefully choose vegetables and fruits for carving, because the result of your work and how long this work will look beautiful and fresh will depend on their quality (the latter is relevant for a feast lasting several hours).

Choose dense, ripe fruits and vegetables of the correct form;
The rind must not be damaged;
Peel vegetables and fruits, if necessary, immediately before work;
Some vegetables (beets, carrots) are well soaked for 15 minutes in cold water before work;
So that peeled and chopped apples, pears and eggplants do not darken, sprinkle them with lemon juice or soak for 15 minutes in water with salt and lemon juice before work;
Ready-made figures from vegetables and fruits can be stored in cold water before serving;
On the table, it is good to sprinkle the figurines with ice water from time to time, so they will last longer.
Master classes: video
Cucumber lilies: master class
Carrot or cucumber bell: master class
Orange flower: master class
Cucumber rose: master class
Carved apple: master class
Zucchini and tomato flower: master class


