BUNS
Grease the cakes with oil and sprinkle evenly with sugar. The more sugar, the more "caramelized" the bun will be. Usually, 1 ~ 1.5 teaspoon of sugar and 1 teaspoon of butter are taken for a cake with a diameter of 15 cm.
For sprinkling, in addition to sugar, the following are used: poppy; cinnamon; small raisins; crushed nuts; sesame or sunflower seeds.
Roll the prepared cakes into rolls. This is the main blank of the bun. Further, the formation of buns can go in different ways.
BUN "HEART"

1. Fold the roll in half.
2. The ends of the roll must be connected together.
3. With a knife, make a through cut along the figure, not reaching the end (the junction of the two ends of the roll) 2~3cm.
4-5. Unfold along the cut line, layers up.
BUN "HEART", option 2

This bun is formed in exactly the same way as the first, but the cut is not made completely, leaving 1 or 2 layers uncut.
In this case, the bun unfolds not so wide and the cut forms something like a well or recess, in which you can additionally put something, for example, a piece of butter, or add sugar.
BUN "TULIP" or "THROLIF"

1. Two cuts are made along the workpiece.
2. The blank is opened along the cuts - the extreme petals are parted to the sides and unfolded in layers upwards. The middle petal either does not move or rotates.
BUN "ROSE" or "CURL"

These buns can be made either small or large.
For small buns, small cakes are made and, accordingly, small rolls; for large buns, the dough is rolled into one large layer, which is then rolled into a large roll.
1. Cut the roll into pieces.
2. Pinch one end of the piece.
3. Layers from the second end open like petals.
BUN "BOW"

1. Cut the roll (without bending) on both sides so that an uncut part remains in the middle. Make cuts along the roll.
2. Expand the bun along the cuts.
BUN "BOAT"

1. Fold the roll in half.
Make a cut along the figure, not reaching the end (the junction of the two ends of the roll) ~ 2 cm.
2. Turn the cut workpiece on its side. Bend the top so that it lies on the table.
3. In this case, the fastened ends of the roll are UNDER the expanded petals.
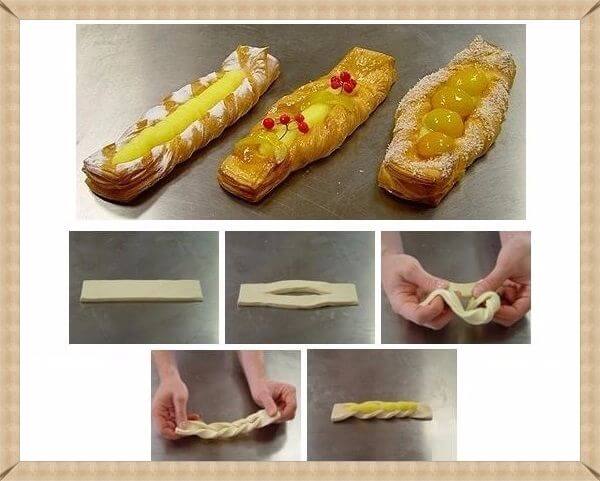
BUN "TWIST"

1. In the roll, make a through slot (along the product) from one edge to the other, not reaching the ends ~ 2 cm.
2. Move the resulting hole apart.
3. Pull one end of the roll into it.
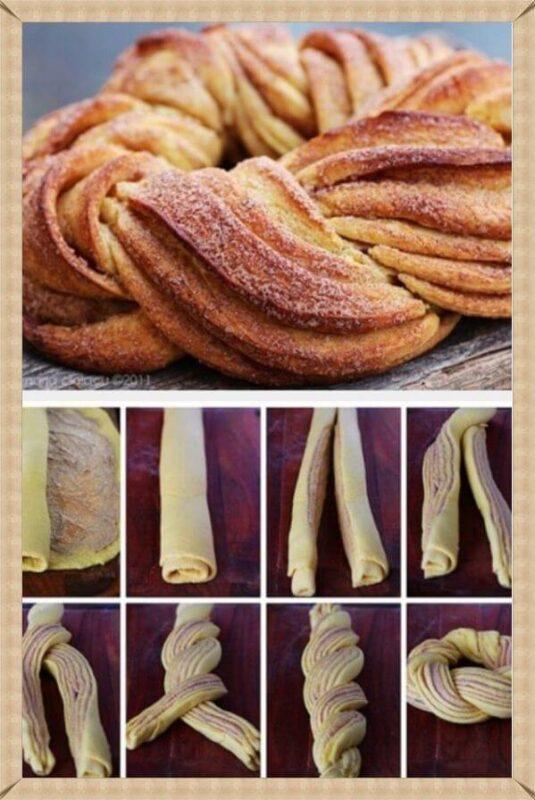
BUN "ROPE"

This figure is best made from a large roll. If you make small "strings", then you get only 1-2 weaves and the finished product has a poorer look.
1. Departing from one end of the roll by 2 ~ 4 cm (depending on the size of the roll), make a longitudinal cut to the second end. Expand the product along the cut in layers up.
2. Twist the two resulting strips together. Bring the ends together and pinch tightly.
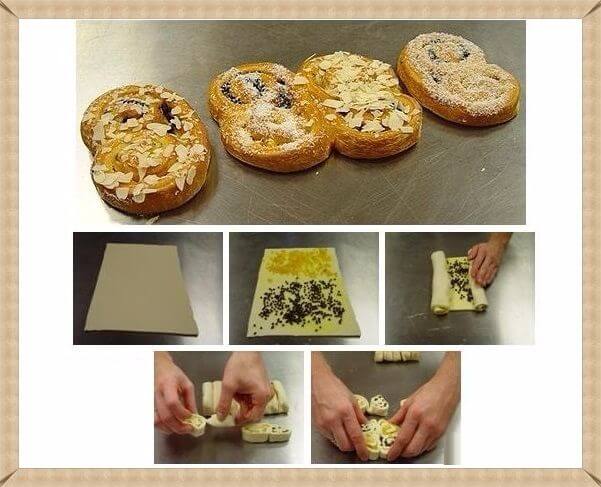
BUN "EIGHT"

2. Take the resulting strips to the side and connect in pairs (to get a figure.
3. Secure the ends carefully.
BUN "BUTTERFLY"

1. At the roll, bend both ends so that they connect in the middle of the roll.
2. Where the folds are, make cuts.
3. Open the product along the cuts in layers upwards.
BUN "SUN"

1. Cut the roll across. The distance between the cuts is 1~1.5cm.
2. Wrap the roll in a ring, cuts outward (this will open the cuts).
BUN "COMB"

1. At the roll, make the same cuts as in the "Sun" option.
Rotate the roll so that the uncut side is at the bottom and the cuts are facing up.
2. Alternately bend the teeth to the left, then to the right.
BUN "CORN"

1. Make a cut to the middle of the roll.
2. Cut the uncut part with a knife in the form of small squares.
The notch should either crush the dough, or cut through only one layer of dough.
3. Lay the cut ends on the sides of the uncut part, turning them with the cuts up.
BUN "DEER HORNS"

1. Cut the roll across. The cuts should be at a 45° angle to the axis of the roll.
2. Bend the roll into a semicircle, notches outward. When folding, the notches will open.
BUN "SPIDER"

1. Make cuts at both ends of the roll so that there is 1~2cm of uncut space between them.
2. Turn the resulting 4 parts with the cut up.
3. Cut each part in half lengthwise again.
You get 8 "legs" that need to be moved apart so that the product takes on the appearance of a spider.
BUN "TULIP"

1. Make two through longitudinal cuts at the roll so that an uncut part 1~2 cm long remains in the middle.
2. Connect the resulting 2 strips from one side to make a loop.
3. Turn the remaining two ends with the cut up and place the edge under the resulting loop.
BUN "BROOM"

1. Cut the roll in half lengthwise to the middle. Turn the cut pieces cut side up.
2. Cut each one 1~3 more times to get the appearance of rods.
3. Cut the uncut part across, cutting through only one layer of dough.
Buns made from rolls are not inferior in appearance to portioned products, and much less time is spent on them.
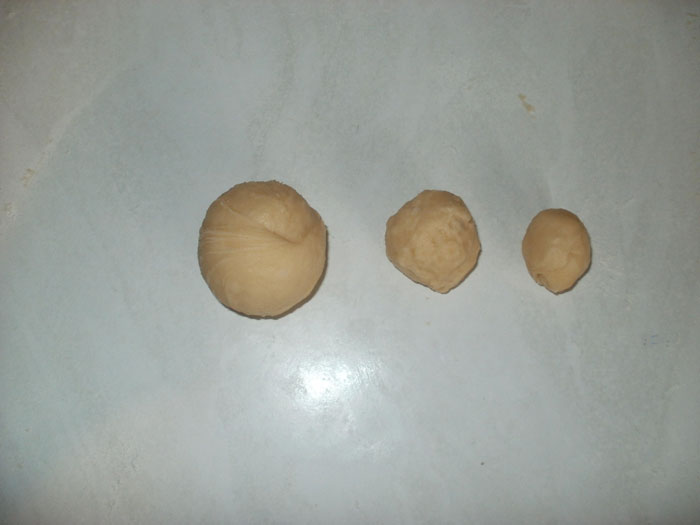
Form a ball from the dough.
Then roll it into a layer about 25x35 centimeters in size.
Spread evenly with vegetable oil and sprinkle with sugar.

Roll up into a roll.

You can roll the roll both in length and in width. The size of the finished buns will depend on this.
BUN "CURL" or "SPIRAL"

1. Cut the roll into slices 2~2.5 cm wide.
2. Lay the slices on a baking sheet.
BUN "DOUBLE SPIRAL"

1. Cut the roll into thick slices 5~7 centimeters wide.
2. In the middle across the workpiece, make a cut without cutting 1~2 layers to the end.
3. Place on a baking sheet, opening the bun along the cut.
If desired, you can make not one, but 2-3 cuts. Then, when unfolded, the product will take the form of a flower from several spiral petals connected together.
BUN "OYSTER"

1. Cut the roll into pieces, deflecting the knife 30 degrees either to the left or to the right. When viewed from above, the pieces of the roll should look like equilateral trapezoids.
2. Put the trapezoid on the widest side. The narrow side will be at the top. Press firmly in the middle of the narrow side of the trapezium a thin round stick, such as a ballpoint pen, pencil or wooden skewer.
BUN "CHRYSANTHEMA"

1. Cut the roll into bars 10~12 centimeters long.
2. Put them upright.
Scissors make vertical cuts in a circle - from the middle to the edge.
3. Straighten the resulting fringe.
BUN "SWALLOW"

1. Cut the roll into slices. But the cut should not be straight, but consisting of two cuts - from the center to the edges with a slope of 45 degrees.
You should get a figure that has a dovetail cutout on one side, and a protruding corner (dovetail) on the other side.
2. Take the workpiece in hand. Pinch the cut side.
3. Put the workpiece on a baking sheet with a pinch down.
Open the upper protruding corner in layers.
flower buns


They brought the dough for buns, pies and pretzels, but you don’t know how to cut the dough so that the fancy products turn out beautiful - see the step-by-step photo.
beautiful buns
Section "Orchid": roll out, cut out a square, fold in a triangle, make cuts along the sides, leave a section of dough without a cut, unfold the square, connect the cut ribbons in the center.

Section "Peony": roll out, cut out a square, fold in a triangle, make cuts along the sides, leave a section of dough without a cut, expand the square, fold the triangle with other corners, make cuts. Expand the square, connect the cut ribbons in the center. Put the stuffing into the flower petals.
Section "Curls": roll out the layer, flavor with stuffing, roll into rolls on both sides, cut across.

Cutting for muffin "Rose": roll up a bun, roll out a circle, make 4 cuts at equal intervals, put the filling in the middle, fold the rose petals in turn.

Sweet "Bows": roll up koloboks, roll out mugs, fold the circle in half, make cuts 4 external and 3 internal.

A simple flower made from sweet yeast dough: roll the sausages, connect them into rings, put the filling to the two walls inside the ring, connect in the center, as shown in the photo.
Beautiful puff Kalach: roll a bun out of it, roll out a circle, grease with filling, roll into a roll, cut the roll lengthwise, twist two puff ribbons together, connect the ends to make a roll.
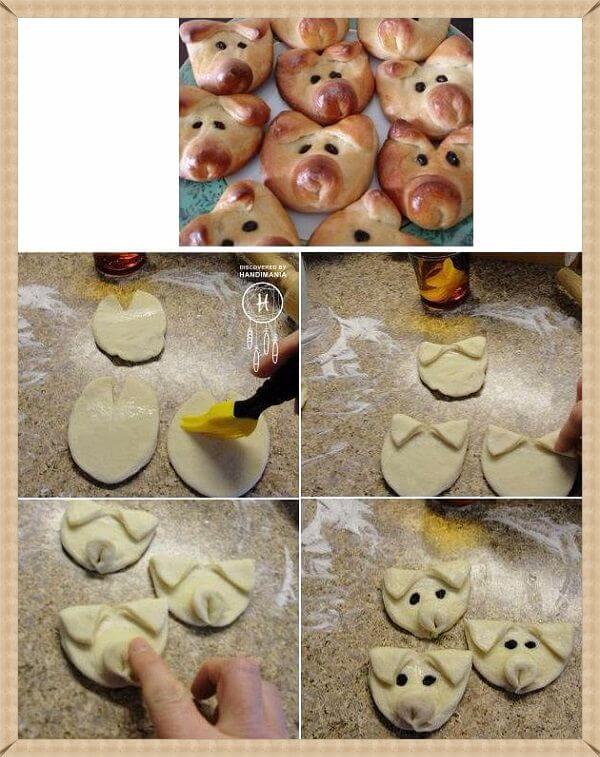
How to make "Piglets" from rich yeast dough. Roll out a circle, make a small incision on top, bend the corners - the ears. We sculpt a piglet for a pig in the lower part, bending the edge and flattening it a little. The piglets' eyes are made of raisins.

Sweet "Mushrooms": a circle is rolled out, which is then cut into pieces (see photo) and laid out in the form of mushrooms.
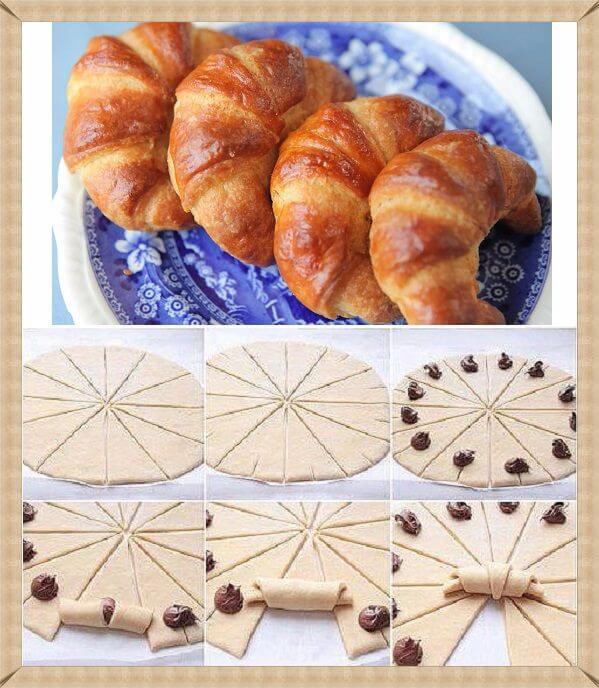
"Croissants". Roll out the circle and cut it into triangles, cutting from the center to the outer edge. An incision is made on the outer side of the triangle in the middle and the filling is laid out at its end. The croissant is rolled from the outer edge to the center.
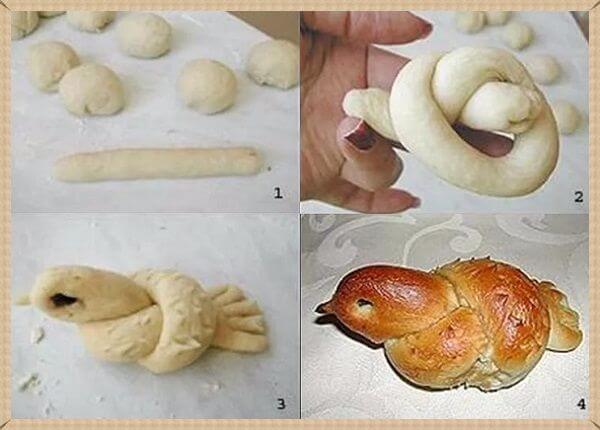
Bun "Bird": roll up the sausage, wrap one end around the index finger and thread it into the resulting ring. With a small pinch, shape the dough into a beak shape. The tail needs to be flattened and cuts made, giving the appearance of feathers. Eyes are highlights.
And here are simple options for beautiful buns made from sausages. By the way, even a child can make such forms. Involve the little ones in this entertaining baking process. At the same time, develop fine motor skills and imagination.
How to decorate pies

Cake decoration "Flower": roll out a round-shaped layer, put a bun of filling in the center. Carefully distribute the rest of the filling in a circle, leaving space from the edges and the central bun. Cover everything on top with another layer of dough. With a small bowl or tea cup, press the edges around the center filling. Cut the outer edges with an openwork knife. Then evenly cut the dough with the filling, which you have goes along the outer ring. Slightly turn each "petal" stuffing up.
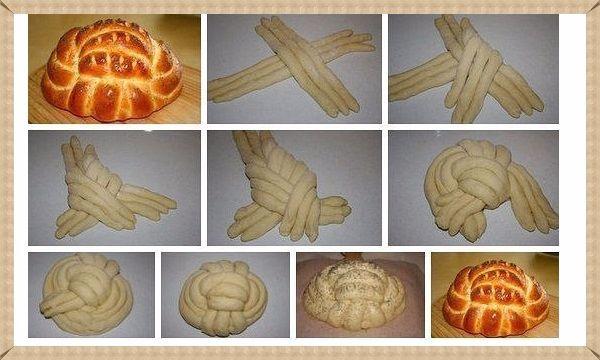
Cutting Butter Loaf. Roll up the flagella - sausages and weave a loaf of them, as shown in the step-by-step instructions in the photo.
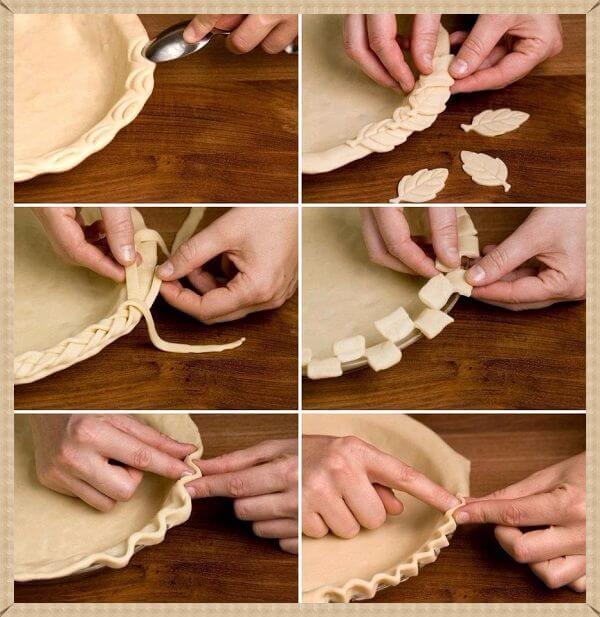
And here are the options for decorating the edge of the pie.
Cutting the dough "Pigtail" or "Spikelet"
The simplest version of "Pigtails". A rectangle is cut out of the rolled out layer of dough, a longitudinal incision is made in the center. Then, one edge is threaded several times through the resulting hole. Thus, the edges are twisted into a spiral. The filling is laid out in the center.

"Pigtail with sausage". Three sausages are connected by the upper edges. Then a slice of sausage is laid out between them. Weaves like a braid. The right harness is placed between the left and center, then the left is placed between the right (which is now on the left) and the center (which is on the right). Again, a slice of sausage is placed and the weaving of the pigtail continues.
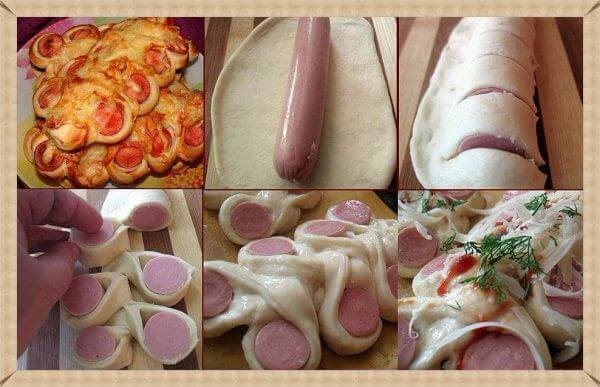
Sausage in the dough "Pigtail". This delicacy is sometimes called "Obzhorka" in culinary shops. The sausage is laid out in the center of the dough cake. Then the edges stick to each other, and the sausage wrapped with dough is cut into equal parts. Each polka is turned inside out with the sausage side up and placed through one on opposite sides of the middle. Sent to the oven when half cooked. Sprinkle with cheese, herbs on top, grease with mayonnaise or ketchup (for an amateur). And bring the pastry to readiness.

Beautiful bun "Spikelet". This baking option is done simply, but it looks very beautiful. We roll out a thin layer, grease with vegetable oil or an egg, sprinkle with sugar and cinnamon (poppy seeds). We turn the roll, which we then cut with scissors a little obliquely, as shown in the photo. We spread the resulting "spikelets" into one large beautiful bun.
And this is a simple pigtail with a poppy. The sausage is covered with poppy seeds and cut with scissors, spreading the petals on different sides.
Note to the owner:
To get rid of domestic ants, it is necessary to dilute 9% vinegar in water, 1: 1, and treat the places where insects accumulate.
Date: 2015-04-14
Hello everyone! In this article I want to tell and show with the help of step by step photos how to sculpt yeast buns, with and without filling. I specifically miss the preparation of dough, fillings, sprinkling with various products, because the article is designed only to show what forms of dough buns can be obtained.
When I baked the buns in different shapes, they all seemed to taste different, although the dough was the same, which our whole family liked. Now I always try to sculpt yeast buns in different ways. Of course, I can’t keep up with Valentina Turcan, and there was no such goal. But you will definitely learn how to sculpt the classic forms of buns.
I hope that everyone knows that before shaping buns, the dough must rise well so that it becomes pliable and easy to work with.
Let's start with ordinary buns that can be molded from a tourniquet. We roll the ball of the approached dough into a tourniquet, and then we form a bun:
Pigtail: fold the tourniquet in half and twist 2-3 turns.
The pretzel is simple: fold the flagellum as in the photo, press the ends and cut the fringe.

Snail: We twist the tourniquet in a spiral in the shape of a tower

S-shaped curl.


Now we complicate the task - a bump: we roll the tourniquet into a ribbon and cut one edge to half after 1 cm.

We twist, like a snail, in a spiral in the shape of a tower, with the teeth outward.

Bird: leave a piece of dough on the head, roll the rest into a tourniquet so that the middle is thicker than the edges.

Twist the tourniquet 1 time and put the head

Another form of a bun without a name: we roll half the dough into a ball, and half into a tourniquet. We form a ring from the tourniquet, put a ball in the middle.

Bunny - sculpted by my mother, who came to visit just in time. We divide a piece of dough into 3 parts: small, medium and large.
We roll out most of it into a flagellum, from the middle we sculpt a head.

We form a bunny by attaching all the parts.

Now consider the buns from the balls.
Flower: press the ball of dough crosswise with the blunt side of the knife.

Coffee bean: Press the oval along with the blunt side of the knife.

Caterpillar: divide the dough into 3 equal parts, shape into balls and put in a row.

Pyramid: Roll out 4 equal balls from a serving of dough, put 3 together down and one up.

Bar: bread in miniature. Form and cut with a knife.
Bun. When forming buns, the dough is smeared with a large amount of melted butter, due to which layers are obtained. For one thing, I did not fool around, and used sunflower oil.
We knead the dough into a cake, grease with oil and fold it four times.

Fold in half lengthwise.

We make an incision to the center.
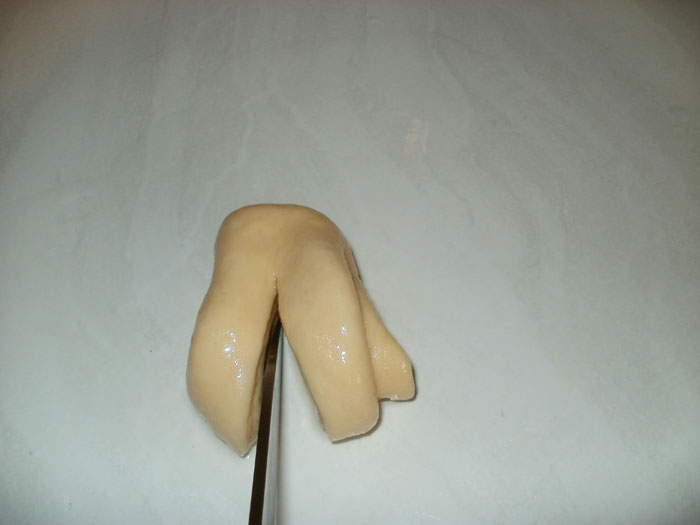
We unfold the cut part and get a bun.

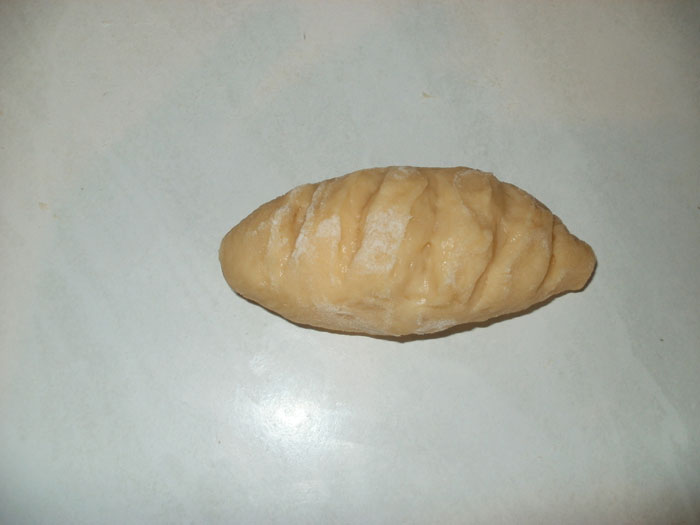
Scallop. Usually done with stuffing. We put jam on the cake and fold it in half so that the top edge goes beyond the bottom.

We make incisions around the circumference in the form of a fringe and give the shape of a crescent.

Cheesecake. It is very important - the dough for cheesecakes should fit on the baking sheet so that it is not shifted later. In the approached ball of dough, we squeeze out the recess, leaving the sides of a centimeter diameter.

In the middle we put the curd forcemeat.

Rastegay - prepared with or with liver. For clarity, I used cottage cheese. We put the minced meat on the dough cake, and pinch the edges from above, leaving a hole at the top for pouring the broth.

Open pie: in the cake we make two holes along the edges, put the minced meat in the middle.

We pass the opposite edges into the holes, leaving the top and ends open.

Bagel. Bagels are not sculpted one at a time, dozens are best. We roll out a portion of the dough into a round layer and cut into 10 parts.
![]()
Under the wide edge we put the stuffing and cover, press.

We roll the bagel.
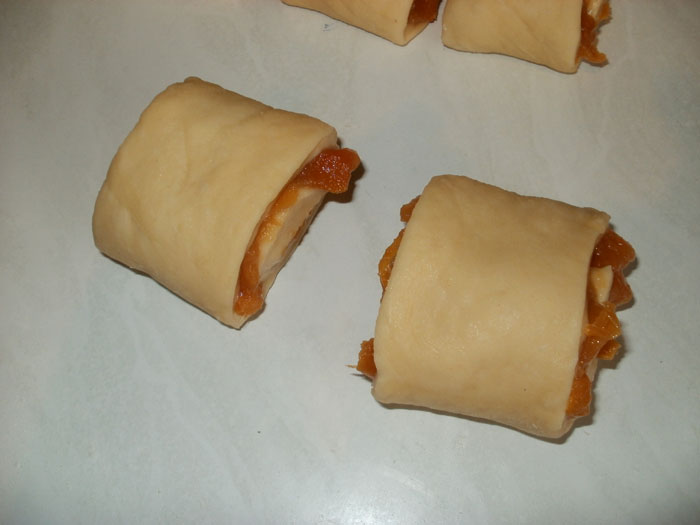
Rolls with poppy seeds or jam. They also don't fit one at a time. We roll out the dough into a narrow long layer, grease with jam, jam or poppy seeds, leaving a clean edge 1 cm wide.

Roll into a roll and cut with a knife into portions.
And here are the final photos, bon appetit! By the way, if you like to bake from yeast dough, then here's another one.


Views: 220575
Hello to all culinary lovers! Today we will talk about delicious pastries. And if even more precisely, then I will tell and show you what forms of jam buns can be made. The article will not contain dough recipes or the filling itself, only step-by-step photos, pictures and a description of how to wrap buns and make them beautiful and appetizing. I think that you will definitely find suitable options for culinary design.
And at the end of the article I will tell you where you can find even more interesting information on this topic. After all, developing your skills and being creative in the kitchen is a hobby of many women, and some men too.
Roses
Such beautiful muffins can be made not only with jam, but also with cottage cheese, if you prepare the filling accordingly. They can be prepared from yeast mass or with the addition of baking powder.
- Divide the dough into equal small portions and roll into balls.
- Then, using a rolling pin, roll out our ball so that we get an even circle. We make four symmetrical cuts.
- I put jam in the center. For this form of bun, it is necessary that the filling be very dense, like marmalade.
- Raise one petal of the future rose and wrap around the jam.

- The second in a row we wrap the opposite petal. Then do the same with the remaining petals.
- The result should be a neat bud.
- We spread all the blanks on an oiled baking sheet, grease the muffins with whipped yolk and send them to the oven.
- Blush roses are ready! I hope everything is clear in the photo step by step.

rings
To prepare such buns, you will need puff pastry, as it retains this shape better. Baking in the form of rings can also be prepared with sugar, cinnamon, poppy seeds. But since we are talking about jam, then we will consider the molding with this filling.
- Roll out the dough into a rectangular shape. Then we make parallel cuts on it approximately to the midline of the formation.
- On the part of the rectangle that remained intact, put the jam.
- Starting from the edge where the filling lies, wrap the dough into a tube. The cut strips remain with us on top. Their ends should remain on the bottom side.
- As a final step, we connect the ends of the roll to make a ring. Prepared kulebyaki can be sent to the oven!

classic buns
They are best prepared from yeast or lean dough. Despite the banal form, such pastries look very good. Since the buns are closed, you can put any filling inside, the main thing is that it is not very liquid and does not leak out during baking. Although even semi-liquid jam (for example, or raspberry) can be made thicker if desired.
- We divide the dough into small pieces (as for pies). We roll them into a round layer and put a spoonful of jam in the middle.
- We form either a round bun or an elongated shape in the form of a pie. We pinch the edges.
- Top with egg (preferably yolk) and sprinkle with sesame seeds, poppy seeds or sugar. After the future muffins rise slightly, we send them to bake.
- The result is a very beautiful pomushki.

Bagels
This form of buns is simple, you just need to cut out the rolled layer correctly and carefully wrap the bagel.
- We roll out a small part of the dough into a thin round layer. If there is a problem with the circle, then you can use a large plate or a lid from the pan as a stencil. The resulting circle is cut like a cake.
- On the outer edge of each triangle lay out a spoonful of jam.
- Starting from the wide edge, wrap the dough into a bagel. This must be done carefully so that the filling does not come out around the edges.
- To make the pastry ruddy, brush the surface with beaten egg yolk. After baking, quite decent bagels are obtained.

Cheesecakes
In this form, not only sweet buns are often made, but also cottage cheese ones. Let's see how to make them.
- We form small balls from the dough and make cakes (you can use your hands or a rolling pin). Then, using a glass of suitable diameter, cut out even circles.
- We also use the ring that remains after cutting. We twist it in the form of a figure eight.
- The result is two parts of the future bun - the base and the side.
- The twisted ring is placed on the circle. From below, you can slightly pinch the sides and base.
- In the middle of the blank we put a spoonful of any jam or jam.
- We send it to the oven for baking.

Daisies
Despite the simple manufacturing method, such pastries look very elegant and festive. Even a novice cook can master it.
- We roll out the finished yeast or puff pastry into a layer and cut out even circles from it. If you have the skill of baking, you can immediately roll out mugs from small pumps without using a mold.
- Each circle is cut into six petals. We pinch the tip of each petal to make it sharp. Press the center of the workpiece with your finger to make a recess for the filling.
- We put all the chamomiles on a greased baking sheet and only then put the jam in the middle. The petals themselves can be smeared with yolk mass.
- We bake chamomile buns in a preheated oven until golden brown.

boats
This is another interesting option, how you can simply and quickly wrap a product with jam or thick jam.
- Taking a small amount of dough, roll it into an oval or circle. On both sides we make small cuts.
- We put a spoonful of filling on the cake - closer to the side from which we will start wrapping the dough.
- We bend one edge so that the filling is in the hole. Then we do the same with the second edge.
- Ready ruddy muffins can be served at the table!

Delicious pastries will be very good with any tea. By the way, do you know how to make ginger tea? I recommend you some of this drink. It will be interesting to know your opinion in the comments which forms of buns with jam and marmalade you liked the most out of the eight presented.
And if you like baking buns, buns, pies and other goodies, then you will surely be interested in good cookbooks with recipes and photos. It is this selection that I bring to your attention - it contains exclusively literature on baking. I hope you find something for yourself or as a gift for your loved ones.
Happy culinary creativity! Nadezhda Goryunova
Buns cooked on yeast dough are airy, soft and tasty. The original design can make them ideal. The secret of success lies in the accurate and virtuoso work with the dough.
Beautiful pastries step by step: original forms for buns
Housewives who often bake yeast dough buns know that baking forms can be very different: from the simplest to the most complex.

There are so many recipes and master classes on beautiful pastries that it’s enough for at least every day of the year.
Types of buns by shape:
Cooked buns can be proudly called a culinary masterpiece.
Ingredients
It is very easy to prepare a sweet dough if you strictly follow the instructions for its preparation and do not experiment with the amount of ingredients.
Dough Ingredients:
Yeast dough is prepared using the no-dough method. Which means mixing all the ingredients at once.
In order for the buns to turn golden and ruddy before baking in the oven, it is necessary to grease them with a mixture of beaten eggs with sugar and a spoonful of milk.
The buns should rise for 15 minutes before baking. Then you need to send them to the oven, bake at a temperature of 200 degrees until cooked.
How beautiful to cut buns: a boundless flight of fancy
In order for the buns to turn out beautiful and intricate, you need skill, which every housewife can acquire over time.
The main working material is dough, improvised means - a knife and skillful hands.
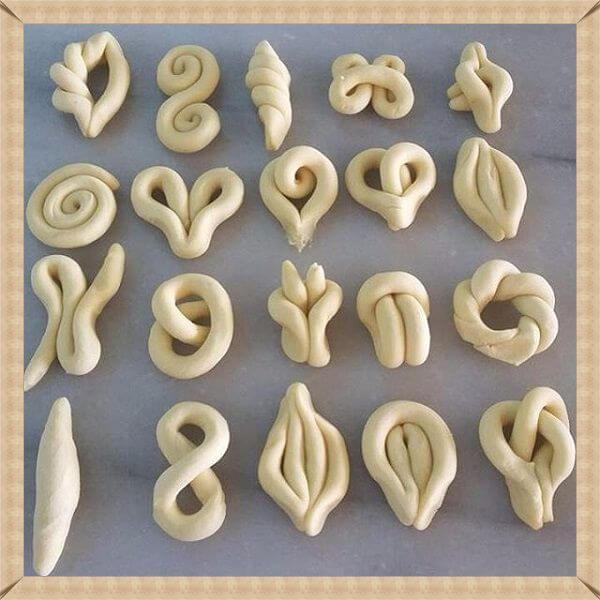
Due to its structure, the dough provides many opportunities for imagination. Buns can be made in the form of open and closed rose buds, in the form of a wide variety of flowers, spikelets, curls, snails, bows, scallops
How to make beautiful pies: quick ways to form
Every hostess knows that they can also be very beautiful, which will be highly appreciated by family and friends. The main thing in the whole enterprise is to monitor the quality of dough molding so that it does not lose its shape during baking.
There are a lot of ways to sculpt beautiful pies. Each hostess can contribute to this art by showing her imaginationPossible types of beautiful pies:
Harmonic. Roll out the dough into a cake, put the filling on the edge, cut the rest into thin strips. Then you need to roll the cake and pinch all the test strips in turn. Triangle. Roll out the dough into a square. Make cuts to make a triangle and wrap the dough. Gold fish. Here you can show your imagination by taking the shape of an ordinary pie as a basis, attaching fins and a tail masterfully cut out of dough to it. It is not difficult to fashion beautiful buns. Success will depend on properly prepared dough. It should not stick to your hands and fall apart. There are so many forms and types of dough cutting for buns that every housewife will find exactly the recipe that the whole family will like.

A long time ago in some foreign magazine I saw a box decorated with egg shells. Well, as usual fantasy flooded over the edge. First, I developed a lesson at school on the topic "Mosaic". And the children learned to stack pieces of shell on plates. Then I decided to make a panel using this technique. …
1. Do not rush to throw away magazines, catalogs and even books. You can make interesting things out of them. Here is an example of a pencil holder. We take a magazine. We cut off about half to get the height of the stand we need. We divide the pages into 6 parts. We fasten holding ...
I draw with an iron. This is not a typo and everything is in order with my head. But seriously, I want to bring to your attention a technique that is not common in our time - ENCAUSTIC. Here is what you can find about this technique on the Internet. "Encaustic is the ancient art of painting with hot wax.…
1. Once upon a time, these were varnished autumn boots with high tops. But over time, in many places, and mainly in the places of folds, the varnishing cracked and began to literally crumble before our eyes. But since the lower part of the boots, in general, remained whole, I decided them a little “modified ...
You can buy buns in the store, but if you bake them at home, it will be both tasty and original.
Secrets of making delicious buns:
- If, when kneading dough for buns, add potato starch to it or knead it on a decoction of potatoes, then the baked buns will be lush and soft.
- In the yeast dough for buns, it is better to add slightly melted butter, and not completely melted, as the structure of the dough deteriorates.
- Before you sprinkle the baked buns with powdered sugar, grease them with butter - and they are provided with a pleasant aroma from them.
How beautiful to make buns - dough
For buns you need:
- 600 g flour;
- 1 glass of milk;
- 100-150 g of sugar;
- 100 g butter;
- 2 eggs;
- 12 g dry yeast or 20 g fresh;
- a pinch of salt and vanilla.
Cooking:
- In a bowl, mix flour (2-3 tablespoons), sugar (1 teaspoon), yeast, pour in half of the milk (warm), mix and leave to rise in a warm place for 30 minutes, or until the batter doubles in size, and the top will start to crack.
- In a deep bowl, mix warm milk with eggs that have stood for some time at room temperature, melted butter, sugar, salt, vanilla and sponge.
- Knead the dough until it starts to stick to your hands. If the dough is very thick - add a couple of tablespoons of milk, if watery - a little flour.
- Dust the dough with flour, cover with a towel and leave in a warm place until doubled in size, about 1.5 hours.
- If you are going to make buns with unsweetened filling, then you need to take 1 tbsp of sugar. spoon.
How beautiful to make buns "Flower"
- We roll 4 small balls from the dough, and the 5th is even smaller.
- 4 balls are thinly rolled into circles, trim them with a knife so that they are all the same size.
- Grease the circles with melted butter and sprinkle with sugar. Stack one on top of the other.
- From the center of the circles we make 8 cuts so as not to damage the middle.
- We turn the middle at the place of the cuts so that the layers can be seen and something like a petal turns out.
- We roll up a long tourniquet from the 5th ball, fold it like a snail and stick it in the middle of the flower.
- Let's go for 20-30 minutes, grease mixed with sugar and 1 tbsp. spoon of water with yolk and put in the oven to bake at 180-190 ° C, 20-30 minutes.

How beautiful to make buns "Fish"
Such buns can be made with stewed cabbage.
- Roll out the dough sheet into a circle.
- In the middle of the circle, along the entire length, lay out the filling: where the head will be - more, where the tail - less.
- From one and the other free edge, where there is no filling, and where the head and tail will be, we cut the layer.
- We close the filling with strips on one side and the other.
- We decorate the fish: from the side of the head we make a mouth for the fish, flatten the tail with a fork.
- We put it on a sheet, let it rise for 20-30 minutes, grease with yolks and bake.

How beautiful to make buns - bagels
Bagels can be made with different fillings: thick jam, apples, nuts with sugar, poppy seeds, cottage cheese.
- Roll out an oblong layer of dough.
- We put the filling on one edge, and on the other edge we make cuts, but not completely.
- We twist the roll, and then bend it a little.
- Let the bagels rise, grease with yolk and bake.

How beautiful to make buns "Roses"
- Roll out small circles from the dough.
- We cut them from 4 sides.
- Put 1 tsp in the middle. a spoonful of apple filling.
- We lift 1 petal, half covering the filling with it.
- Then we raise the rest of the petals, shaping the floor of a blossoming rose.
- We let the buns rise, grease them with yolk and bake.

So, we have learned how to bake beautiful buns with sweet and savory fillings.
Sometimes you really want to improve your own culinary skills and get a unique dish that will appeal to all family members. The housewives place a special emphasis on desserts that both adults and children like. It is much easier to go to the nearest pastry shop and buy a treat for tea. But you can also make beautiful buns on your own.
Baking yeast buns
Wrapping, as well as finishing, require a careful approach. You can not twist strips of text arbitrarily. To decorate them beautifully, you need to be smart. An experienced culinary specialist manages to give an unusual and attractive shape to products in a matter of seconds.
Not everyone can bake twisted buns with original patterns on their own. But in reality, special skill is not required here. It is enough to follow each step of the recipe to achieve an effect that affects everyone. The shape of the buns will be perfect. The ingredients are as follows:
- 250 ml of milk;
- 100 g of sugar;
- 2 chicken yolks;
- 0.5 teaspoon of salt;
- 100 g butter;
- packaging of vanilla sugar;
- 1 kg of flour;
- 25 g yeast.
Another chicken yolk and 30 ml of milk will be required to lubricate the buns. If you intend to mold curly buns, how to wrap them correctly is a must-learn. The work is done as follows:
This is followed by the molding of buns. The recipe for making dough for buns is the same, but they can be shaped in various ways. Each recipe has its own characteristics, so you should not deviate from the algorithm of actions.
Nothing is more pleasing to the eye than a beautiful pastry. Methods for folding dough for pies, bagels with filling are different. Even people who do not have much experience in cooking enjoy sculpting some intricate figure such as a rose, for example.
Wickerwork
This form of buns is very popular. The finished products look very appetizing. How shape up:

The surface of the dough is smeared with a mixture and sprinkled with sesame seeds, sugar, poppy seeds. During molding, products are given a clear shape; this can be done using special devices.
Heart and butterfly shaped pastries
 Most often, children like buns with jam. Such products will appeal to adults, as well as puff pastries. To mold such pastries correctly, you must follow the recommendations for wrapping products.
The dough is divided into parts. Roll out one half in the form of a cake, grease with butter. Sprinkle sugar on top.
Next, you need to roll the cake and connect the edges of the dough. The resulting roll is cut lengthwise so that a heart is obtained. It remains only to straighten it. This scheme is also suitable for all other types of buns that you plan to sculpt.
For a product in the shape of a butterfly, the dough mass is divided into parts. Roll out and sprinkle with sugar. A roll is formed, after which it must be twisted into a bundle. Connect the edges in the central part. Cut the roll 1 cm in the center and unfold the butterfly. Her wings should be turned to the sides. After that, you can consider the bun with sugar ready.
Features of baking beautiful buns
 It will not be difficult for both professionals and beginners to make buns with their own hands. How to wrap them will tell you a step-by-step algorithm of actions. Dough products can be wrapped in the shape of a figurine. Such a bun will look beautiful.
After the formation of the rolls is completed, it is necessary to send them for baking in a baking sheet. You need to preheat the oven to 200 degrees. Baking takes approximately 10 minutes. After that, the temperature mark is reduced to 180 degrees. There is no need to take out the buns after this. You should also hold the products for 20 minutes.
Homemade pastry with filling
Rolls can be made in the form of beautiful roses. You can often see such products sprinkled with poppy seeds in stores. They are prepared as follows:
- Knead the dough and roll out.
- After that, it is divided into equal halves.
- 1 part is rolled out in the shape of a rectangle so that a not too thin cake is obtained.
- Lubricate it with vegetable oil and pour a small amount of poppy seeds on top.
- Roll out the dough again.
- Cut into pieces, the width of which should be 10 cm.
After that, it remains to form roses.
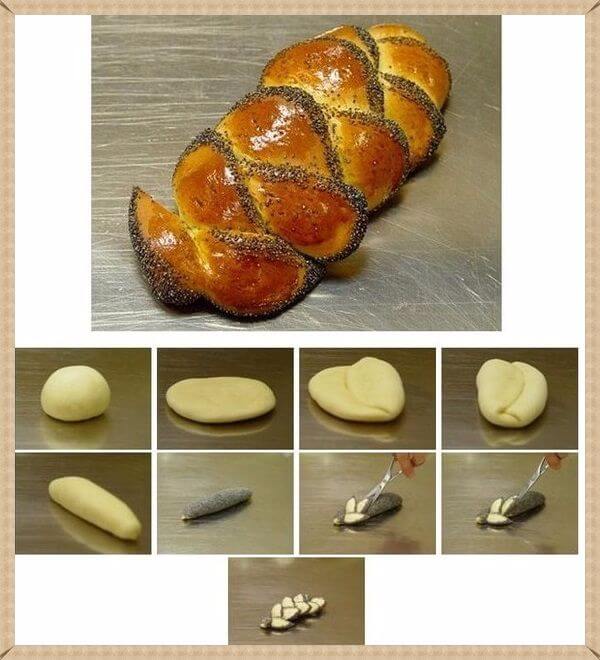
Braids and curls
The dough is placed on the surface of the table, a small amount of flour is poured. Roll out in the form of a rectangular layer. Sprinkle poppy filling on top and fold over. Cut into transverse strips. There should be 12 strips in total.
Twist them in spirals three times. Roll up in the form of rings. Baking with sugar will be ready 20 minutes after it is sent to the oven. The temperature in it should be at the level of 200 degrees.
Stuffed heart
Small cakes are made, smeared with vegetable oil and sprinkled with sugar. Poppy seeds are also sprinkled on top. You can also use cinnamon, it gives not only an exquisite taste, but also a good aroma. Roll the dough into a tube, fold and cut. Form a heart. After that, the buns are sent for baking. The finished result pleases with its originality and beauty.
Cooking sweet buns with apples
This recipe requires a slightly different set of ingredients. Have to take:

Flour is combined with dry yeast, sugar, salt and mixed. Add vanilla powder and knead the dough. Heat milk and add dry ingredients. Crack in a chicken egg.
Put softened butter into the resulting mixture. Stir with a spoon and continue kneading the dough by hand. Roll the dough into a ball, cover with a towel. The container is left in a warm place for 1 hour. After that comes the molding of buns. For baking apple buns with jam, you can also take fresh apples. To do this, they must first be stewed in a pan for several minutes. It is necessary to remove the core from apples, and then cut them into slices.
Braided fir-trees with jam
 The dough is rolled into a cake and cut into medium-sized squares. The central part is filled with jam. Cut the squares into small pieces on the sides, not reaching the core. A space of 5 cm is left in the center, jam is laid out here. Form a braid.
To make a baked Christmas tree, roll out the dough in the form of a cake, cut into triangles. Each product is cut from 2 sides into fragments, a Christmas tree is formed. Grease the top of the baking with a mixture of yolk and milk. Form buns. Bake well in the oven so that they get a golden hue.
Spirals with jam and roses
 Roll out the dough into large sheets. Put the stuffing on top. Complements apple jam with raisins. The edges are overlapped. The finished roll is cut into strips and across. Their width should be 3 cm. About 12 strips will be enough. Roll them up into a spiral shape. Put them, greased with jam, baked on a baking sheet with vegetable oil.
To make a rose from dough, first cut the apples into slices. Boil in water for 5 minutes, add citric acid. Roll out the dough into a layer and cut into strips. All strips are smeared with apple jam, sugar and cinnamon are poured on top.
The strips are placed in the center, after which apple slices are laid on them. The stripes are folded in the form of a rose with an apple.
Curd products
Few people are able to refuse cottage cheese rolls served with tea. This filling is very popular. You can bake not only sweet rolls. Even salted cottage cheese will be quite appetizing.
Beginners can start with the simplest recipe for cottage cheese envelopes. To do this, the dough is divided into squares. The curd filling is laid out in the center. Fold the corners in the center and bake until done. There are also more intricate options.
To make roses with cottage cheese, roll out dough cakes and cut into three parts, but not completely. Put the stuffing in the center. The edges are wrapped around the filling. Roll up to form roses.
For people who have some experience in baking, we can recommend cottage cheese buns recipe. To do this, roll out the dough into a rectangle. After that, you need to cut it into squares and put the filling in the center. Notches are also formed at the corners. The dough with the filling is folded and the edges are pushed into the holes. The second edge must also be wrapped. You can consider the products finished. It remains only to send them to the oven.

Dough cutting. In the process of cutting the dough, fermentation still continues in it, therefore, in order to avoid damage to the dough, this process must be completed in a short time.
There are several types of machines for cutting and rolling dough.
The dough can also be cut by hand on a table with a wooden top. After punching, the finished dough is laid out on a table covered with flour, cut off with a knife or scraper a long and even piece in thickness, which is rolled into a long tourniquet. Its thickness depends on the size of the finished product; the larger the product, the thicker the tourniquet must be made. The tourniquet is taken in the left hand, and with the right hand, a portion of the dough is cut off with a knife, which is placed on the scales, while simultaneously discarding the previously laid piece of dough from them.
The mass of dough portions must be accurate; a slight deviation of up to ± 2.5 g is allowed. Portions of dough should have a mass greater than finished products by 12 ... 15%, since baking and cooling occur during baking and shrinkage of products.
Weighed portions are lightly sprinkled with flour and placed on the table. Then they take two pieces of dough and roll them on the table with their palms in a circular motion. When rolling, make sure that there is a little flour between the palms and the dough balls, which prevents the dough from sticking to the hands. There should be no flour between the ball and the table, so that when rolling, the sides of the ball stick a little to the table and the dough is pulled down from all sides, creating a so-called seam. Rolled balls are placed on a table dusted with flour, and after
After 5 ... 6 minutes of intermediate proofing, different products or dough balls are formed from them, laid seam down on a greased baking sheet, at such a distance from each other that during proofing and baking they, having increased in volume, do not connect and deform. It is best to put the balls on a baking sheet in a checkerboard pattern. In this case, more products can be placed on the baking sheet and, in addition, they are evenly baked during baking.
In the process of cutting, carbon dioxide partially escapes from the dough, so the volume of the dough decreases. In order for the dough to be enriched with carbon dioxide again, and the volume of the molded products to increase, they are placed for proofing in a humid place where the temperature is 30 ° C, and covered with a napkin so that the products do not wind up.
The molded products are placed in a fermentation cabinet or chamber with a temperature of 35 ... 40 ° C and relative humidity
70... 80%. Proofing continues for 25 ... 40 minutes, depending on the activity of yeast, air temperature, room humidity, product size, dough recipe, flour "strength". The higher the humidity in the proofing chamber, the shorter the rise time. Small products during molding lose more carbon dioxide and cool more, so they require longer proofing.
Products with a large amount of muffin and with weak yeast activity also require a longer proofing. The end of proofing is determined by the increase in the volume of products. To the touch, the products should be light, airy.
With insufficient proofing, the products are small, poorly baked, the crust has tears. This is due to the fact that at the first moment of planting products in the oven, the temperature increases, and the fermentation process occurs more intensively. Products begin to increase in volume, the crust formed on their surface cracks. If the products are left for too long, then they turn out to be flat, blurry, without gloss and pattern.
Kneading of yeast dough and products from it:
a - kneading the dough; b - donuts "Moscow"; in - cheesecakes; g - products from yeast puff pastry; e - pie with fresh fruit and jelly; e - baked pies with fruit filling
To give the molded products a beautiful appearance, they are smeared with a soft brush with egg yolk or melange. The most beautiful gloss is obtained by lubricating products with egg yolk. In order for the egg mass to more evenly cover the products, it is lightly beaten with a brush or whisk before use (but not knocked into foam); it is best to strain the grease through a sieve. The egg can be mixed with a small amount of water, but in this case the gloss on the products is less beautiful. Products are lubricated 5 ... 10 minutes before planting in the oven, very carefully so as not to wrinkle them.
Immediately after greasing the products with an egg, they are sprinkled with chopped nuts, granulated sugar, cracker or flour crumbs, or a mixture of these products.

Dough division:
Cutting dough with special devices and notches (a, b, c)
and portioning of finished products (g)
Baking modes. Sweet products that are not lubricated with an egg should be baked in ovens with humidifiers. At the 5-6th minute after the products are placed in the oven, steam is formed in the baking chamber. Baking products in a humidified chamber increases their yield and improves quality. As a result of contact of the product surface with moist air, starch gelatinizes on the surface, dextrins partially dissolve, and liquid starch paste floods the surface of the product. After the condensation stops, the layer of liquid paste quickly dehydrates, forming a film on the surface of the crust, which gives the products a glossiness.
Certain baking modes are established for each type of dough, and in order to obtain good quality products, they must be strictly observed. Therefore, confectionery cabinets and ovens are equipped with a thermometer. It is very convenient to regulate the temperature in cabinets with electric and gas heating. a certain average temperature, but so that it is evenly distributed, otherwise one part of the product will be ready and will start to burn, and the other will still be damp.In addition, if the bottom or one of the walls of the oven is colder than the others, then the wet part of the product will move to its more cold part, as a result of which a “hardening” may form, i.e. an unroasted layer with high humidity.
Small products made from yeast dough are baked at a higher temperature (260 ... 280 ° C), as they warm up quickly and do not have time to dry until a crust forms.
At a high temperature, you should first bake products from “weak” flour, otherwise the dough will have time to blur too much; these products are baked at a lower temperature.
Rested products are also baked at a higher temperature to maintain their shape. Such baking increases the productivity of workers and increases the throughput of the oven.
Large rich and poorly loosened products are baked at a lower temperature (200 ... 220 ° C), since slow heating of the products contributes to their uniform baking. The larger the products and the more they contain granulated sugar and other muffins, the lower the baking temperature should be, otherwise the crust will char and the products inside will be raw.
During baking, the products brown on the outside, i.e. a brown crust is formed. Its color depends on the amount of sugar and amino acids in the dough. Sweet dough quickly acquires an intense brown color during baking. Due to the loss of moisture and a certain amount of nutrients, there is a loss of mass of confectionery products during baking.


