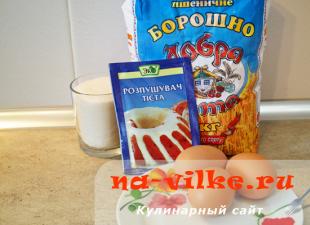
Aged paper is popular with lovers of various types of needlework: scrapbooking, decoupage, as well as those who like to create original things. A vintage-style wedding invitation on aged paper will match the overall mood of the celebration. A handmade greeting card is best made on aged paper. Use 19th-century fonts that give the letters swirls like pen and ink. Place on the postcard poems of your own composition, glorifying the beauty of the one to whom it will be addressed. And this will impress a girl much more than a huge bouquet of flowers or a teddy bear on half a sofa.
In what style direction is aged paper used
Paper is different from paper, this also applies to aged paper. Depending on the style in which the craft will be made, the method of aging paper is selected. To date, the most popular and used styles are the following:
- Vintage style (vintage). It consists in giving things a false antiquity. The style is characterized by heavy tones of beige and brown colors. It should give the impression that the paper, under the influence of sunlight and time, has darkened, scuffed, frayed edges and burned in some places (it is assumed that a lit candle fell on the paper). The optimal method of “aging” paper is distressing, for which strongly brewed coffee, ink, sandpaper, and an ink pad are used.
- Heritage (legacy). In fact, this is an analogue of the vintage style, only used for decorating family albums and portrait and thematic photographs. And it is not the paper that grows old, but the photographs themselves. For example, when the younger generation, surprisingly similar to the great-grandmother, is placed in the photo next to their ancestor. For less contrast, photos are made older by the heritage method.
- Shabby Chic style. It is characterized by pastel shades (pale pink, blue, pale green, beige), wrinkling of paper, the effect of cracks, applying primer to paper, and curled edges.
What are the techniques for giving the effect of antiquity to paper
There are special techniques that can recreate a particular effect.
- Craquelure is the effect of creating a crack in a lacquered or primed finish. Recreate the illusion of cracks in paintings. In ancient times, craquelure (cracks) appeared in paintings due to a violation of technology. For example, due to insufficient primer, the lower layers of paint absorbed moisture from subsequent new layers, as a result of which they quickly dried out and cracked. There are special craquelure paints and varnishes that, when applied to paper, give the effect of cracks.
- Distressing is the artificial aging of paper with organic products such as coffee, tea or milk. The ruler and scissors loosen the structure of the edges of the paper so that they look shabby from time to time. In stationery stores you can find special distressed inks. After uniform application to a sheet of paper and complete drying, traces of uneven drying, scuffs and burnout remain.
- Embossing or embossing on paper. It is obtained using stencils or stamps. Food foil, glitter powder, etc. are also suitable. The embossing method creates convex initial words that are outlined in golden or silver paint. Against the background of aged paper, all this looks very impressive and unusual.
- Journaling. This method helps to recreate the text typed on an old pre-war typewriter. Journaling is used to describe the events displayed in the photographs. It looks much more appropriate than the usual handwriting.
What improvised materials are used for aging paper
Regular black tea
Take a sheet of white A4 office paper. Brew 5 to 10 tablespoons of regular unflavoured black tea in a mug (the older you want the end result to look, the more teaspoons you add).

After 10 minutes, strain the tea leaves through a strainer into a bowl. Hold the leaf in the tea leaves for 5 minutes. Take out the sheet, put it on the table and dry it with a hair dryer.
When the moisture has evaporated, go over the sheet with an iron through a piece of cotton fabric. Then make a few drops on top in a chaotic manner. To give the "soot effect" hold the finished sheet over a hot burner.
Natural ground coffee:
- remember the paper well with your hands
- brew 5 tablespoons of ground coffee in a glass of boiling water
- pour the tea leaves into a tub or bowl
- hold the sheet there for 5 minutes
- remove and dry with an iron or hair dryer
Milk
Pour half a glass of milk of the highest % fat content. Finish the edges of an A4 sheet with sandpaper and nail scissors. Using a brush, apply milk all over the sheet. Take a hot iron and with quick movements “stamp” the surface of the paper with it.
It's easy to make paper old. However, do not overdo it, because over time the sheets will fade on their own. Excessive aging can lead to the fact that a family album, albeit very stylish and colorful, will have to be moved to a modern, but more reliable one.
Video: how to quickly age paper
When I was about to age the paper, my relatives bombarded me with questions. Here are some of them: why? Why manually, if you can in Photoshop? And what are you going to do with her now?
If you still decide to start aging paper, then you don’t have such questions, because there is scrapbooking, framing and photographs, and just full of decorative works that are unthinkable without such paper.
So, there are many ways to age paper. Now I will talk about four of the simplest and, from my point of view, the most effective.
Tea aging.

We will need:
- Black leaf tea - 5 - 10 tsp (the stronger the tea leaves, the older the leaf, I took 5 spoons, for a slight yellowness).
- Boiling water - 250 ml.
- surface for drying.
Paper preparation.
I wrinkled the paper, it was possible to make only a few creases, it was possible not to wrinkle at all.
Welding.
Brew tea with boiling water and leave for 10 minutes under a closed lid. We filter. Pour into the bath.
Aging.
We lower the leaf into the tea leaves, while still young. We leave for a minute or two.
Drying.
We take out the paper from the bath and lay it out on a flat surface.
After drying, I ironed the sheet with an iron.
A few drops of tea on top of the finished sheet will give the paper an even more realistic look.
The edges can be burned with a lighter/candle. You can hold an electric stove over a hot burner, and dark spots will appear - “traces from fires” that the paper has “survived”.
REMEMBER FIRE SAFETY!
Aging with coffee solution.(my favorite way)

We will need:
- Natural ground coffee - 5 tsp with top.
- Boiling water - 200 ml.
- Tray, for soaking the sheet.
- A sheet of white paper for the printer.
- surface for drying.
Paper preparation.
Made the paper very wrinkled.
Welding.
Brew coffee with boiling water and leave for 10 minutes under a closed lid. We filter very carefully, we defend for several minutes so that the sediment settles. Pour into the bath.
Aging.
We lower the paper into the composition. We leave for five minutes. If soaking for too long, the paper will “fall into insanity” and “refuse to get out” of the bath in one piece.
Drying.
After drying, I, again, ironed the sheet with an iron.
Now you can sit down for three hours for fortune-telling on coffee grounds.
Aging with milk.

We will need:
- Milk - 150 ml. (milk should be full fat, homemade is best).
- Tassel.
- A sheet of white paper for the printer.
- surface for drying.
- Iron.
Paper preparation.
I rounded the corners of the sheet with nail scissors. So that the edges do not look too neat, I “walked” along them with sandpaper, and all over the sheet, for one thing, too. We crumple or not crumple the paper. I rumpled.
Aging (1 part).
We lay out the sheet and “paint” it with milk on both sides. We give time to soak.
Drying.
Lay the sheet out on a flat surface. Luckily, the cutting board I was drying the sheets on turned out to be carved. Still wet sheet, I gently pressed the paper into the thread. After drying, the ornament will remain on the sheet.
Aging (part 2).
Now we connect a hot iron to the process. We iron until brown spots appear on the sheet, as well as perspiration on your forehead.
Aging by the sun.(The most economical way).

We will need:
- Sheet of white paper.
- A couple of sunny summer days.
Paper preparation.
We crumple or not crumple the paper. I didn't hesitate.
Aging.
We hang the paper so that light falls on it all the time.
We dance ritual dances and make sacrifices to the gods so that the rain does not drizzle.
The next method is also referred to as aging, although I would call it coloring.
Green coloring.

We will need:
1. A sheet of white paper.
2. Brilliant green, 1% alcohol solution, simply brilliant green - 5-10 drops (depending on the required initial color).
3. Cold water - 200 ml.
4. Tray, for soaking paper.
5. Surface for drying (may remain green forever).
6. Rubber gloves. It is possible without them, but the manicure will not be French at all.
Paper preparation.
I crumple paper.
Solution.
Pour water into the bath, add greens, mix. You can not mix, then there is a chance to treat beautiful stains.
Aging.
We lower the paper into the composition. Leave for a minute or remove immediately in the case of streaks.
Drying.
We take out the paper and lay it out on a flat surface.
I got carried away with corrugated surfaces and laid out a sheet on a plastic cover with a cross in the middle.
After drying, I ironed the sheet with an iron.
In the same way color with potassium permanganate. Unfortunately, I didn't have it on my farm.
Carried away by the topic, I also decided to try iodine. But the result was completely unexpected - the leaf turned purple. Then I remembered something about phenolphthalein and experiments in the school chemistry room, but I immediately forgot it.
Another way to age is to place the wet sheet on a rust-prone surface.
Get very effective rusty paper. On it after that it will be possible to write letters of supplication with the addition “it will not rust after me!”.
P.S. I would be grateful for the comments - they motivate well for the next master classes 🙂 and don't forget that I'm still doing wedding photography 🙂
P.P.S. When copying to your page, do not be too lazy to indicate the authorship of Victoria Bartosh with a link to the original article http://site/kak_sostarit_bumagu/
Fans of various homemade products constantly need to look for some new tips on how to do something interesting with their own hands. Now I want to talk about how at home. This technique can come in handy if you need to prepare original invitations, write a letter or even just an interesting note to your loved one.
How to age paper at home?
He will consider several simple ways by which a piece of "ancient papyrus" can be obtained from a modern snow-white sheet. By the way, everything you need for such a transformation can be found in every home.
Method One: Tea
To do this, you need to brew this drink of a certain strength (the color of the page will depend on this) and put a leaf there at night. The next morning the paper will look as it was intended. You can also experiment with tea leaves, they leave pretty circles on paper.
Method number 2: Coffee with milk
The next method, which tells how to age paper at home, involves the use of coffee with sugar and milk. This ready-made drink must be poured onto paper, and then ironed through cheesecloth. You will also need to work with the edges, cutting them off manually.

Method three: Let's remember Lenin's grandfather
How to age paper at home if there is no coffee or tea at hand? Use milk. So, the paper needs to be put on a flat surface and on top with a brush it is good to “paint over” it with milk. Let the sheet dry, and then iron it through the iron. The page will gradually turn yellow. Please note: the fatter the milk, the darker the finished leaf will be. This method is good to use if you need to give the product the appearance of paper miraculously saved from fire. The result is simply amazing!
Method number 4: Varnish!
And now we will tell you how to quickly age paper. To do this, you need to use which is sold in stores for artists. It needs to cover the surface of the sheet, and it seems to begin to crack, acquiring a certain shade. However, it is worth mentioning that it will no longer be possible to write on this paper, so the inscription must be made in advance.
Method five, classic
But the easiest and surest way to age paper is to put it in the sun. The process will be quite lengthy, but failures or any mistakes are practically impossible - the paper will age evenly.
Method #6: Not for the faint of heart
There is another, but rather dangerous way to age paper at home. To do this, it must be put in the oven for a certain time. But in such a situation, it is very important to correctly calculate the temperature and time in order to avoid a fire. Still, this method is best used in exceptionally extreme cases.

Edge processing
When figuring out how to artificially age paper, do not lose sight of one very important point. The edges of your "manuscript" should be at least slightly frayed. The surest thing is to tear off the strips unevenly by hand (the edges of the sheet can be moistened, so they will tear more easily). On top of all this, you need to lightly singe with a candle flame, then the edge will look natural and very aesthetically pleasing. If you like, you can also make some dark spots on the paper (again using a flame). Just hold your leaf a little over the candle. However, you must be extremely careful so that it does not burn through.
Who among us has not dreamed of holding an old book or a map in our hands, receiving a letter from the past? It would seem that this is rather problematic, because antiquarian books are expensive, and letters are not stored for such a long time.
But what if you try to make a book or a sheet of paper, a letter, a card or a postcard visually older on your own? After all, it's so simple!
Let's talk with you about how to age paper with and without text, and in what cases you may need this skill.
Decor with paper
First of all, let's consider the following question: why do we need aged paper at all and why can and should it be used?
First of all, it is needed for the design of various crafts: postcards, photo albums, invitation leaflets. It can also be used to create original albums, recording sheets, thus showing its originality.
Agree, an "antique" book, a vintage postcard or just a sheet of parchment with a picture or a map will delight any person, no matter how old he is and no matter what he is fond of. Let's talk about how to make aged paper at home without resorting to outside help and without spending a lot of money on it.
Ways

There are many ways in which you can "age" the paper. The most famous of them are its aging with the help of tea and coffee, as well as open fire or the thermal effects of electrical appliances, sunlight. Also, paper can be "spoiled" with milk, lemon juice and potassium permanganate.
For those who are wondering how to age paper with text, we note that the latter should only be printed with a laser printer. If the text was printed using an inkjet printer, then it will simply flow under the influence of water. In order to age paper with such text, only methods of heat treatment of paper are suitable.
We will consider each of these methods so that you can independently choose the one that is more convenient for you. If you want, you can try changing the paper with each of them and then compare the result.

Processing paper with tea
First, let's talk about how to change a sheet of paper using various liquids. Let's start with one of the most famous ways, that is, we will discuss how to age paper with tea. This is the simplest and most accessible method for everyone.
In order to age paper with tea, you will need strong brewed tea at the rate of 5-10 teaspoons of tea leaves per glass of water (if the tea is in bags, then three tea bags will suffice). Tea should be brewed for 10 minutes, then it must be filtered.
After pouring the finished tea into a small bath, soak the sheet of paper you need in it (you can pre-crush it so that the paper is better saturated with water, and also in order to give it an older and shabby look), let it stand for a couple of minutes. Then we take it out of the water and wait until the sheet dries. Finally, iron it with an iron, leveling the surface of the sheet.
Helping coffee
Now let's talk about how to age coffee paper. This method of aging is not much different from the previous one. The difference is in the brew itself. For a glass of water, you need 5 teaspoons of natural ground coffee. Brewed coffee should be infused for 10 minutes, then strain. In this case, the sediment should not get into your bath, in which you age the paper. Otherwise, streaks and traces may remain on the paper. In some cases, the residue can be used to create scuffs and brighter small specks on a sheet of paper.

The time for which a sheet of paper should be lowered into the solution is no more than five minutes, otherwise the sheet will get wet and tear when trying to get it out. In addition, we do not recommend that you put several sheets together in the bath, otherwise they will bunch up into one soaked piece of paper and tear.
A sheet of paper should also be dried on a flat surface, and it is ironed after drying with an iron.
In the event that you do not have natural coffee at home, you can replace it with instant coffee.
We apply milk
Now let's talk about how to age paper with milk. To do this, you need milk with a high percentage of fat. It's better if it's at home. You should also find a brush with which you will apply it.
We crumple a sheet of paper, then with a brush we carefully paint it with milk on both sides. After it is well saturated on both sides, lay it out on a flat surface. Let it dry for some time. Then we iron the sheet with an iron. In this case, the temperature should be high enough, and dark brown spots should appear on the paper itself.
In addition, you can also dry a sheet of paper in a microwave oven or with a hair dryer. The main thing in this method of aging is the effect of high temperature on the solution itself, which is impregnated with a sheet of paper.
Lemon juice
Let's say a few words about how to age paper with lemon juice. This is another rather interesting and probably well-known way to many. So, aging paper with lemon juice. If you were fond of detectives as a child, then you probably know that many criminals and even detectives wrote their secret notes with lemon juice. At the same time, the inscription appeared only under the influence of high temperatures.

To age paper with lemon juice, you will need the sheet of paper itself, lemon juice, and a hair dryer. A hair dryer can replace a microwave or a hot iron.
Squeeze juice from lemon. Then we apply it to a sheet of paper with a sponge, brush, or simply by dipping it into a container with lemon juice. Then you should lay the sheet on a flat surface and dry with a hair dryer. As it dries and under the influence of heat, it will begin to darken.
Now you also know how to artificially age paper with lemon juice.
Alternatively, this method can be used for additional sheet decor. So, you can make inscriptions on a sheet with lemon juice, and then develop them. This is a rather original way to decorate postcards and albums.
Aging paper with potassium permanganate
If you have potassium permanganate at home (that is, just potassium permanganate), then it will be easy enough for you to age any paper. To do this, pour a few granules of potassium permanganate into the bowl in which you are going to paint the sheet, then dilute it in cold water until completely dissolved. In this case, the solution should be a saturated dark pink color. When working with the solution, be sure to wear gloves so as not to stain or burn your hands.
After that, we dip the paper in water for five minutes. When it is sufficiently saturated with water, we take it out of the container and lay it out to dry.
After drying, the paper acquires a pleasant brown tint. Now you also know how to age paper with potassium permanganate. As you can see, this is quite an interesting and simple way. In addition, with the help of potassium permanganate, fabric items can also be artificially aged.
Aging paper with a candle
Now let's move on to thermal methods of aging paper. First of all, let's talk about how to change the age of paper using fire.
The simplest and, most likely, well-known method is to use fire to age the paper and give it the appearance of a thing that survived the fire.
For this you need a candle. At the same time, the paper will have to be aged over the sink in order to quickly extinguish it in case of fire and prevent a fire.

We put the candle in the candlestick and then set it in the sink. After that, we light a candle. We pick up the sheet of paper you need and begin to carefully drive it over the candles. At the same time, there should be a distance of at least 10 cm between the paper and the fire. Do not hold the paper in one place. So you can set it on fire.
Microwave as a means of aging paper
As you know, paper darkens when exposed to heat. Heat can be radiated by both fire and a device powered by electricity - a hair dryer, a stove, even an electric fireplace. But let's talk about the thing that every home probably has - a microwave.
One of the easiest ways to age paper is to put it in the microwave for a while at 200 degrees Celsius. In this case, the paper itself should be pre-moistened in water or a solution of tea (coffee).

Alternatively, you can put the paper in the refrigerator first and then microwave it. In this way, you can also age the paper for several years. Now you know how to age paper in the microwave.
Aging with the sun
Well, those who want to add age to paper in the most natural and simple way, without resorting to fire or electrical appliances, various tinctures, should use the help of the sun.
On hot summer days, you can use the easiest way to age paper - sunny. To do this, you need to put a sheet of paper or even hang it so that sunlight falls on it all the time. In a few days it will be ready. But in this way, paper should be aged in advance.
conclusions
There are many ways to age a sheet of paper. We have discussed only the most famous and used of them. All of these methods work equally, although the appearance of the paper may differ.
If you are in doubt which method to choose, experiment with each of them and compare the results. Remember that the type of aged paper largely depends on how strong the solution you treated it with, as well as how strong and long the thermal process of exposure was.
If you need to age paper for something, it can be easily done with tea. Whether you want to use paper in a photo album, age an entire book, or make the perfect play accessory, tea can make paper look like it's been through the years. You can dampen the paper with tea bags to age it slightly, or soak it deep in tea for a darker look. After the tea treatment, you can air dry the paper or use the oven to give it an even more ancient look.
Steps
Part 1
Brew some tea- If you use a cup that is not designed for hot drinks, you can get a painful burn. Take a tea or coffee cup and do not use plastic or metal utensils that are not designed for boiling water.
- You can take any tea, although black tea is most often used for such purposes. You may not want to use green and red teas, as they can give a different color and the paper won't look old.
-
Pour water into a kettle or small saucepan. You will need enough water to fill the cup, which is about 250 milliliters, however, keep in mind that water evaporates when boiled, so add a little more. If you are brewing tea in several mugs at the same time, add enough water to fill all the mugs.
Put water on the stove and bring it to a boil. To properly brew tea bags, you need to use as hot water as possible. If you are using a saucepan, you will see gas bubbles on the surface of the water as it starts to boil. If you have a whistling kettle, you will hear a thin whistle when the water boils.
- Be very careful when handling boiling water. If the pot has a metal handle, handle it with an oven mitt or towel to avoid burning yourself, and be careful not to spill the boiling water on your skin.
- If you are a child, ask an adult to boil water for you.
- You can also boil water in the microwave if you prefer, but use a microwave-safe plate and place a non-metallic object, such as an ice cream stick, in it, otherwise the water may overheat and explode.
-
Pour boiling water over the tea bags and wait about 5 minutes for them to brew. Carefully pour boiling water into a mug to brew tea. Do not pour water to the very edges of the mug so that it does not spill. Wait about 5 minutes for the tea to brew, or until the water is the color you want.
- Do not add water to the edges of the mug by about 3-5 centimeters.
- If you want a very dark color, brew 2 tea bags in one mug. If you need a lighter shade, 1 sachet will suffice.
-
Sprinkle the paper with turmeric if you want it to be more yellow. Although you can skip this step, a thin layer of turmeric will help enhance the yellowness created by the tea. Rub the turmeric with your fingers on the tea-dampened paper.
Add some coffee grounds to give the paper a brown tint. If you want to give the impression that paper has been exposed to various elements over its long history, you can sprinkle some coffee grounds on its damp surface. Rub the coffee grounds on the damp paper to make it stick better.
- Tea leaves are also suitable for this, but they will give a less pronounced effect. You can even break one of the tea bags if you wish.
- You can remove excess coffee grounds after the paper has dried.
-
Remove excess tea with paper towels. There should be no puddles on the paper and baking sheet. This way the paper dries evenly and doesn't curl too much in the oven.
Place 1-2 tea bags in a heat-resistant mug. The amount of tea depends on how strongly you want to color the paper. In most cases, one tea bag is enough for one sheet of paper, and if you are going to apply only a few stains, one tea bag is enough for several sheets. However, if you want to completely saturate the paper with tea and achieve a very dark color, you will need 2 tea bags per leaf.
Part 3
Dry the paperIf you're not in a hurry, let the paper air dry for 24 hours. While it is fastest to dry the paper in the oven, it can be left to air dry if desired. Just put the paper in a well ventilated area.